A drinking straw left in a kitchen drawer doesn’t look like much, but Straw Flower Crafts for Kids can turn that everyday little tube into something much more interesting.
It is usually just something waiting for the next cup of juice, or the kind of leftover item that gets tossed without a second thought.
But cut it into small pieces, flatten it, bend it, or curl it, and a simple straw starts taking on some surprisingly useful shapes.
A few snips can turn the ends into soft-looking petals, while different colors can give each flower its own cheerful personality.
That makes these crafts especially handy when you need an inexpensive activity without another trip to the craft store.
Straws are easy to find, mistakes don’t cost much, and the projects can be simple enough for short attention spans while still giving little hands something interesting to work on.
And the flowers don’t have to stop at flowers.
They can become cards, gifts, wands, wreaths, bookmarks, and other little creations kids can actually use or give away.
Before getting into the projects, here’s why these humble little straws have more crafty potential than they first appear.
Why Straw Flowers Are More Fun Than They Look

Once you start looking at a straw as something other than a straw, it turns into cut petals, bent stems, layered shapes, or little rolled-up centers.
Add in some paper, cardboard, beads, pom-poms, or craft sticks, and one drinking straw can become a dozen different things.
The fun part isn’t only in making one flower.
It’s in seeing what that little flower can turn into next, a card, a gift, a hair clip, a wand.
That one shift in thinking is what makes Straw Flower Crafts for Kids feel so open-ended instead of a one-and-done project.
Here are 15 ways to turn those colorful little pieces into something kids will actually want to make, with every step spelled out so you won’t need to hunt down extra instructions anywhere else.
A quick safety note: younger children should have adult help with cutting straws, hot glue, and any small pieces like beads or dried lentils that could be a choking hazard.
A tip for group settings: if you’re prepping this for a classroom or a group of kids, pre-cut some of the straws ahead of time and sort the pieces into small trays. That way children can jump straight into arranging and gluing instead of waiting on scissors.
15 Straw Flower Crafts for Kids
1. Straw Daisy Flowers
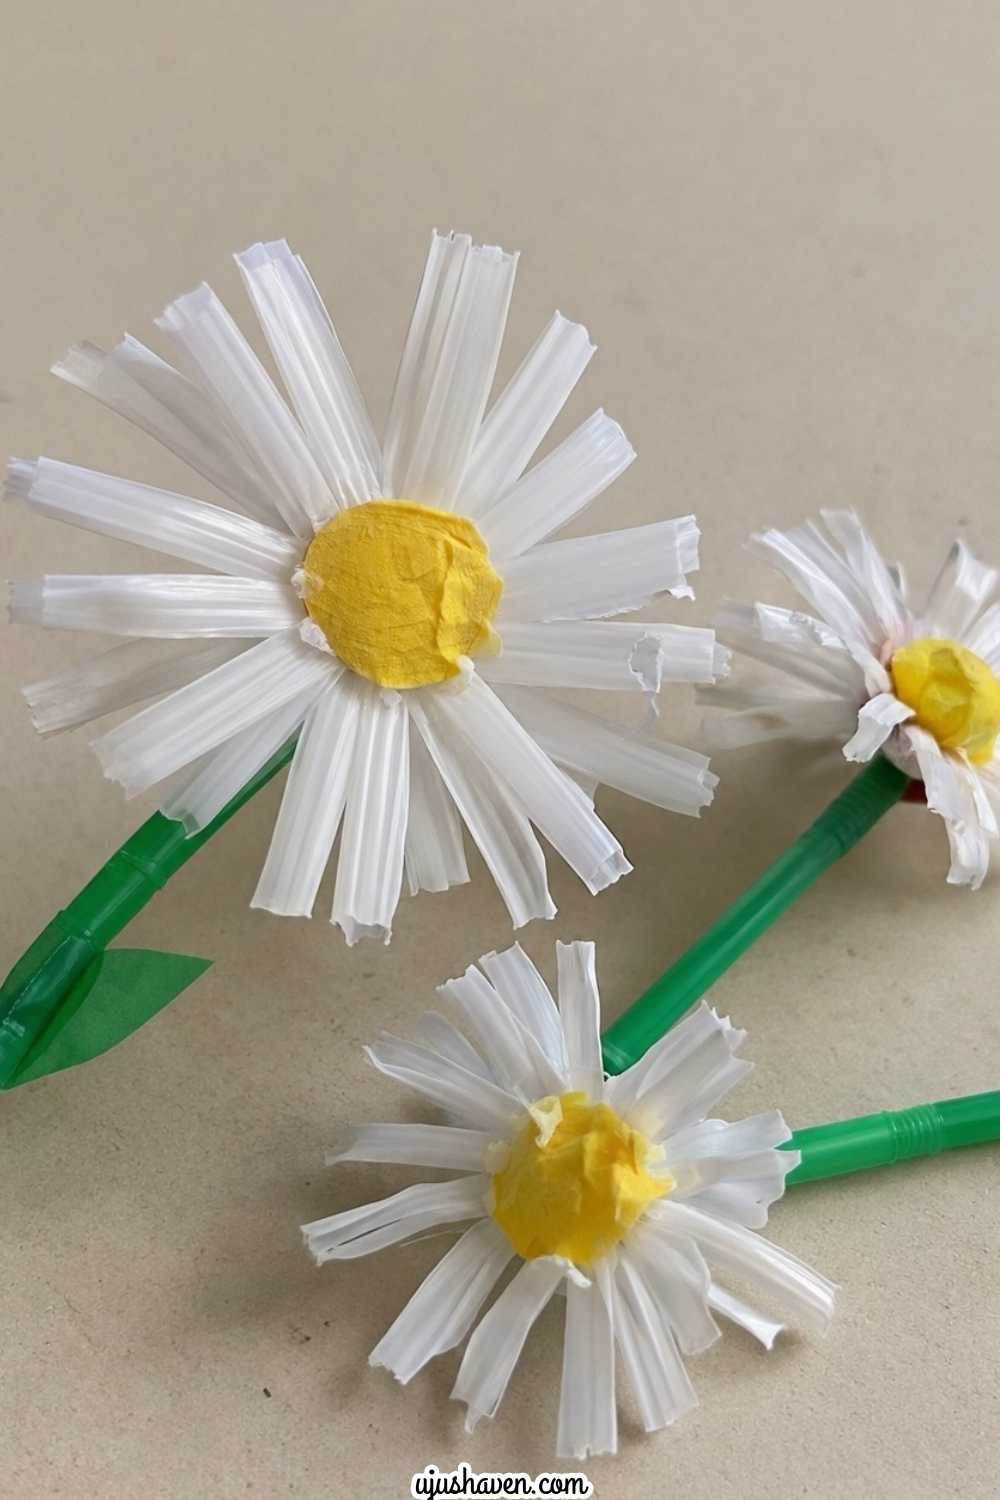
This is the friendliest place to start if you’re trying Straw Flower Crafts for Kids for the first time.
There’s no tricky shaping involved, so it’s a comfortable first project for little hands still figuring out scissors and glue.
What You’ll Need
- White straws (2 to 3 per daisy)
- 1 yellow straw or a small yellow pom pom for the center
- Scissors
- Craft glue (holds straws together much better than a glue stick)
- A green straw for the stem, if you want a full flower rather than just a bloom
How to Make the Daisy
- Cut the white straw down to about 2 to 3 inches long
- Snip one end into thin strips, cutting almost to the middle but not all the way through, about 8 to 10 strips around
- Gently press or curl the strips outward with your fingers so they fan out like petals
- Repeat with a second and third straw, then flatten and layer them slightly on top of each other for a fuller bloom
- Glue a small yellow circle cut from paper, or a yellow pom pom, into the center where all the petal layers meet
- If adding a stem, glue the base of the flower onto the top of a green straw and hold for a few seconds until set
Make the Petals Interesting
Try mixing straw colors on the same flower, or cutting the petals at slightly different lengths so the daisy doesn’t look too perfectly even.
A little unevenness actually makes it look more handmade and less like a template.
Troubleshooting
If the petals keep springing back flat, gently bend each strip around a pencil or your finger to help it hold a curve. That’s enough to give the petals some shape once glued.
Good for: Preschoolers, simple spring crafts, first time straw crafting.
2. Straw Sunflowers

If the daisy is the warm up, this one is the main event. Sunflowers give kids a bigger canvas to layer color and texture on.
Materials
- Yellow and orange straws (3 to 4 per flower)
- Brown paper, brown pom poms, or dried lentils for the center
- Scissors
- Craft glue
- A green straw for the stem
How to Build the Sunflower
- Cut each straw to about 3 inches long, then snip one end of each into petal strips, a bit wider than the daisy petals since sunflower petals are chunkier
- Group the cut straws into three separate flower layers of different sizes, using both yellow and orange
- Curl the petals outward with your fingers on each layer
- Start with the largest yellow layer as the base, place a slightly smaller orange layer on top of it, and finish with the smallest yellow layer in the center, gluing each layer to the one beneath it
- Cut a circle of brown paper for the center and glue it over the middle of the layered petals
- Attach the finished flower head to a green straw stem
The Center Is Where This Craft Gets Interesting
A plain brown circle works, but a textured center is what makes this sunflower feel special instead of flat. A few ideas:
- Dot the brown paper circle all over with a black or dark brown marker to mimic sunflower seeds
- Glue on a scattering of small brown pom poms
- Press tiny dried lentils or dried split peas into a glue covered circle for real texture
Let Kids Experiment
Different petal lengths and shades keep every sunflower a little different from the last, which is part of what makes a finished bunch of them look natural instead of mass produced.
Good for: a bigger centerpiece flower, fall or late summer themed crafts, kids who enjoy a bit more layering.
3. Straw Tulips

After two round flowers, tulips are a nice change of shape and give the roundup some visual variety.
Materials
- Pink, red, or purple straws
- Green straws for stems
- Green paper for a small leaf
- Scissors
- Craft glue
How to Shape the Tulip
- Cut a straw down to about 2 inches
- Instead of snipping straight lines like the daisy, cut a rounded cup shape into one end, three or four soft curves rather than sharp points, leaving the opposite end intact so the petals stay connected at the base
- Gently press the cup shape open so it looks like a small tulip head
- Glue the base of the tulip head onto a green straw stem
- Cut a simple leaf shape from green paper and glue it partway down the stem
A Simple Way to Make Each Bloom Different
Try slightly different cup widths, or use a straw with a stripe or pattern for the tulip head.
Even a small variation between blooms keeps a row of tulips from looking too matched up.
A Note on Straw Type
Bendy straws (the kind with the ribbed section) actually work nicely here since the ribbed part gives the stem a slight natural curve, similar to a real tulip stem.
Display idea: Line several tulips up along a windowsill, or tuck them into a small cup for a quick little spring scene.
4. Straw Flower Bouquets
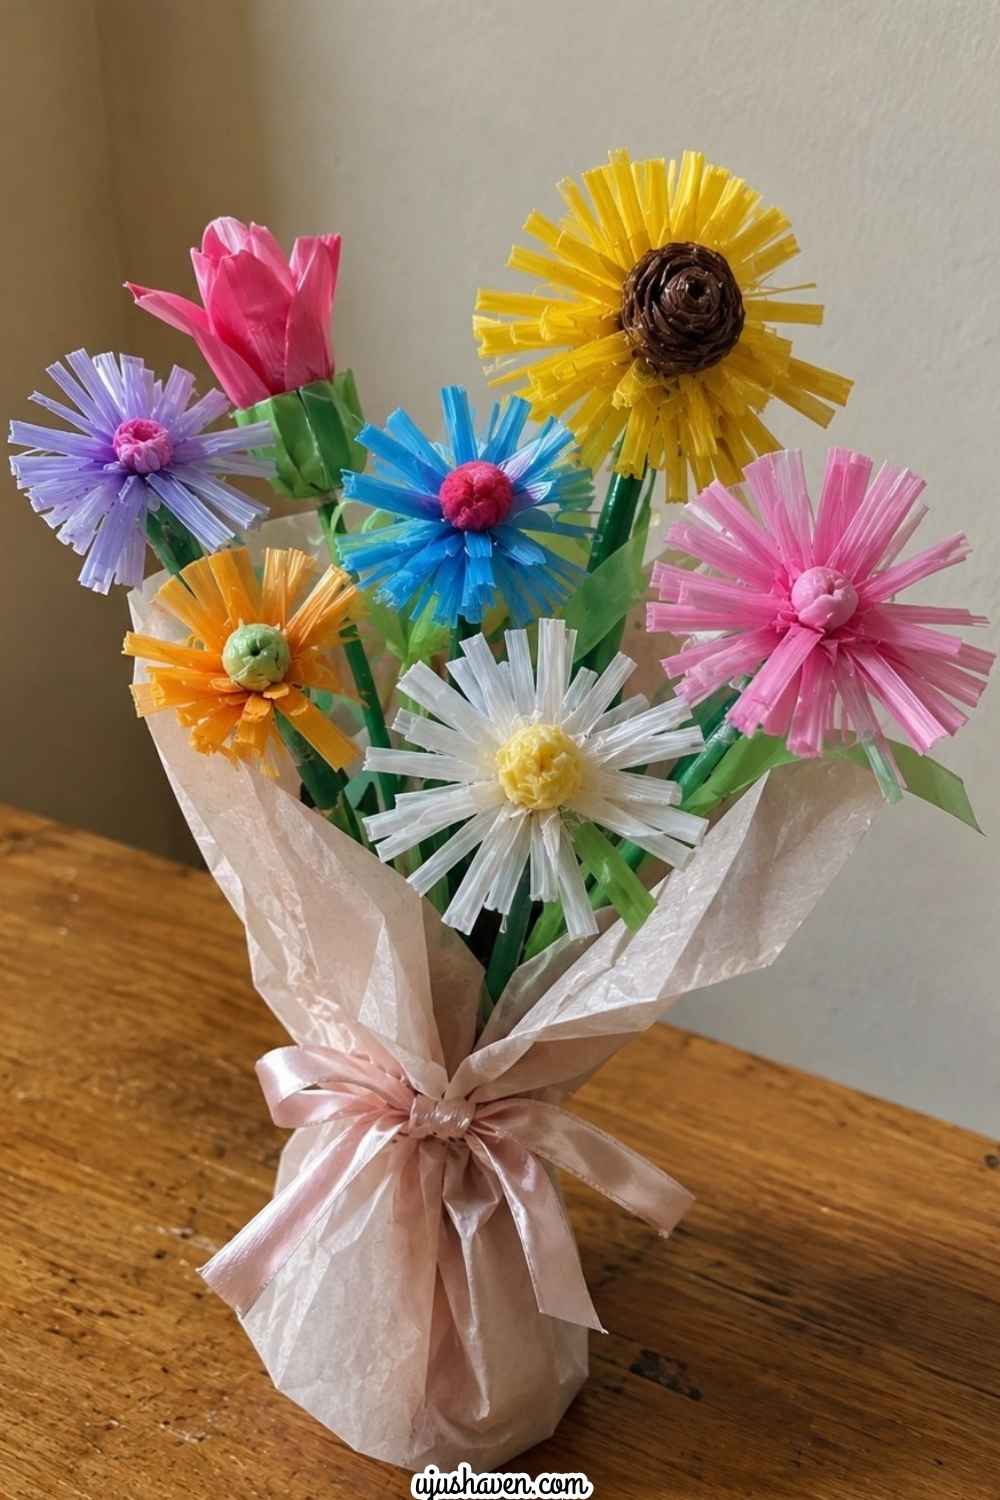
Once you’ve got a few flowers finished, the next step is turning them into something that feels like a real gift instead of a stack of loose blooms.
Materials
- 4 to 6 finished flowers (any style from above)
- Green straws or wooden craft sticks for stems
- Ribbon or twine
- Tape or craft glue
- A small square of tissue paper or plain paper, optional, for wrapping
How to Put the Bouquet Together
- Gather several finished straw flowers, mixing a couple of styles for variety, a daisy or two alongside a sunflower or tulip works well
- If any stems need to be longer, tape or glue a green straw or craft stick to the back of the flower to extend it
- Arrange the flowers in your hand at slightly different heights, taller ones toward the back, shorter ones toward the front
- Once you’re happy with the arrangement, wrap the stems together with ribbon or twine, tying it in a simple bow or double knot
- If wrapping the bouquet, wrap a small piece of tissue paper or plain paper around the base of the stems like a cone, securing it with a strip of tape before tying the ribbon over it
If you like the idea of pairing straws with craft sticks for sturdier stems, 15 Easy Popsicle Stick Crafts For Kids They’ll Love Making has a few stick-based ideas that work nicely alongside these Straw Flower Crafts for Kids.
Gift Worthy Finishing Touch
A little bow at the base of the bouquet, or a small paper wrap around the stems, turns this from a craft table project into something a child can proudly hand to someone.
If it’s going to sit out for a while, keep it out of direct sunlight, since colored straws can fade faster than you’d expect on a sunny windowsill.
5. Straw Flower Pencil Toppers

Not every craft needs to sit on a shelf. This one gets used almost every day.
What You’ll Need
- Small straw pieces
- Pencils
- Craft glue or a small dab of hot glue (adult handled)
- Scissors
How to Make a Tiny Flower
- Cut a short straw piece, around 1.5 inches, and snip one end into thin petal strips
- Curl or fan the petals outward, keeping the whole thing small enough to sit comfortably on a pencil top
- Add a tiny paper circle or small pom pom center
How to Attach It to the Pencil
Glue the finished mini flower directly onto the top of a pencil, letting the petals sit just above the eraser, or wrap around it slightly if the pencil top is unsharpened.
Hold it in place for about 20 to 30 seconds and let it sit undisturbed for a few minutes before use, since these get handled a lot once finished.
Making It Last
Pencil toppers get more wear than most crafts on this list, so a small dab of hot glue underneath (done by an adult) will hold up much better over time than craft glue alone, especially if the pencil gets tossed into a pencil case.
Teacher note: This is one of the Straw Flower Crafts for Kids that works well as a small classroom activity or a back-to-school project, since it turns an everyday school supply into something a child made themselves.
6. Straw Flower Greeting Cards

Here, the flower becomes part of something a child can actually give away.
Materials
- Straw flower pieces
- Cardstock
- Craft glue (a glue stick is fine for the paper leaves, but the straw flower needs something stronger)
- Markers or crayons
- Green paper or a green straw for the stem on the card
Create the Flower
Make one small daisy, tulip, or sunflower, keeping it a bit smaller than usual so it fits nicely on the card front.
Build the Card
- Fold a piece of cardstock in half to create the card base
- Glue the flower onto the front, positioned a little off-center rather than dead middle for a more natural look
- Add a stem below the flower, either drawn on, a strip of green paper, or a short piece of green straw
- Add a couple of paper leaves along the stem
- Let the child write or decorate the inside with a message
Let the Child Personalize It
A short message, a drawn border, or a sticker or two makes each card feel one of a kind.
If the card might get mailed rather than handed over in person, keep the flower fairly flat and light on layers so it doesn’t get crushed inside an envelope.
Who Could They Make One For?
A mother, teacher, grandparent, friend, or anyone with a birthday coming up. This is a nice one to keep on hand for last minute occasions too.
7. Straw Flower Garden Collage

Instead of one flower, this project opens things up into a whole little scene kids get to build themselves.
Materials
- A variety of straw flowers, at least 5 to 6
- Green paper for stems and grass
- Construction paper background, a lighter blue or white works well for a sky
- Craft glue
- Extra paper scraps for details
Make the Straw Flowers
Prepare several flowers ahead of time in different colors and sizes so the child can focus on arranging rather than cutting during this step.
Build the Garden
- Glue a strip of green paper along the bottom of the background for grass
- Arrange the flowers at different heights across the grass strip before gluing anything down, so the layout can be adjusted first
- Once happy with the placement, glue each flower in place
- Add paper stems and small leaves connecting each flower down to the grass line
Add the Little Details
Encourage kids to fill in the scene with butterflies, bees, clouds, sunshine, or a few garden bugs cut from paper scraps. These small extras are what turn a row of flowers into an actual scene.
Let Kids Take Over Here
This is the section to loosen the reins a little. A garden collage doesn’t need straight lines or perfect spacing, so let the child decide where things go, even if it turns out a little wild. That’s exactly the kind of rainy afternoon project that’s meant to be messy and personal.
8. Straw Flower Butterfly

Take those same petal shapes in a different direction, and you get a butterfly instead of a flower, which makes this one of the more surprising crafts in the roundup.
Materials
- Colorful straws, 2 shades work best for contrast
- Black straw or pipe cleaner for the body
- Scissors
- Craft glue
- White paper for antennae
Create the Straw Wings
- Cut straws into petal shapes, the same way you would for a flower, about 6 to 8 petals total, but instead of arranging them into a bloom, set them aside to build butterfly wings
- Arrange half the petals in a slightly larger fan for the upper wings, and the rest in a smaller fan for the lower wings
- Lay the two wing sets so they mirror each other on either side of where the body will go
Add the Butterfly Body
Glue a black straw piece or a pipe cleaner down the center to form the body, with the petal wings fanned out on either side, upper wings above, lower wings below.
Finish the Details
Add small paper antennae to the top of the body, and a few dots or short lines drawn across the wings for extra pattern.
For more keepsake style projects along the same lines, take a look at Butterfly Crafts for Kids That Double as Adorable Keepsakes.
Try This Variation
Switching up the straw colors and patterns can turn one butterfly template into several completely different looking creations, which makes this a fun one to repeat a few times, especially with leftover straw scraps from other projects on this list.
9. Straw Flower Hair Clips
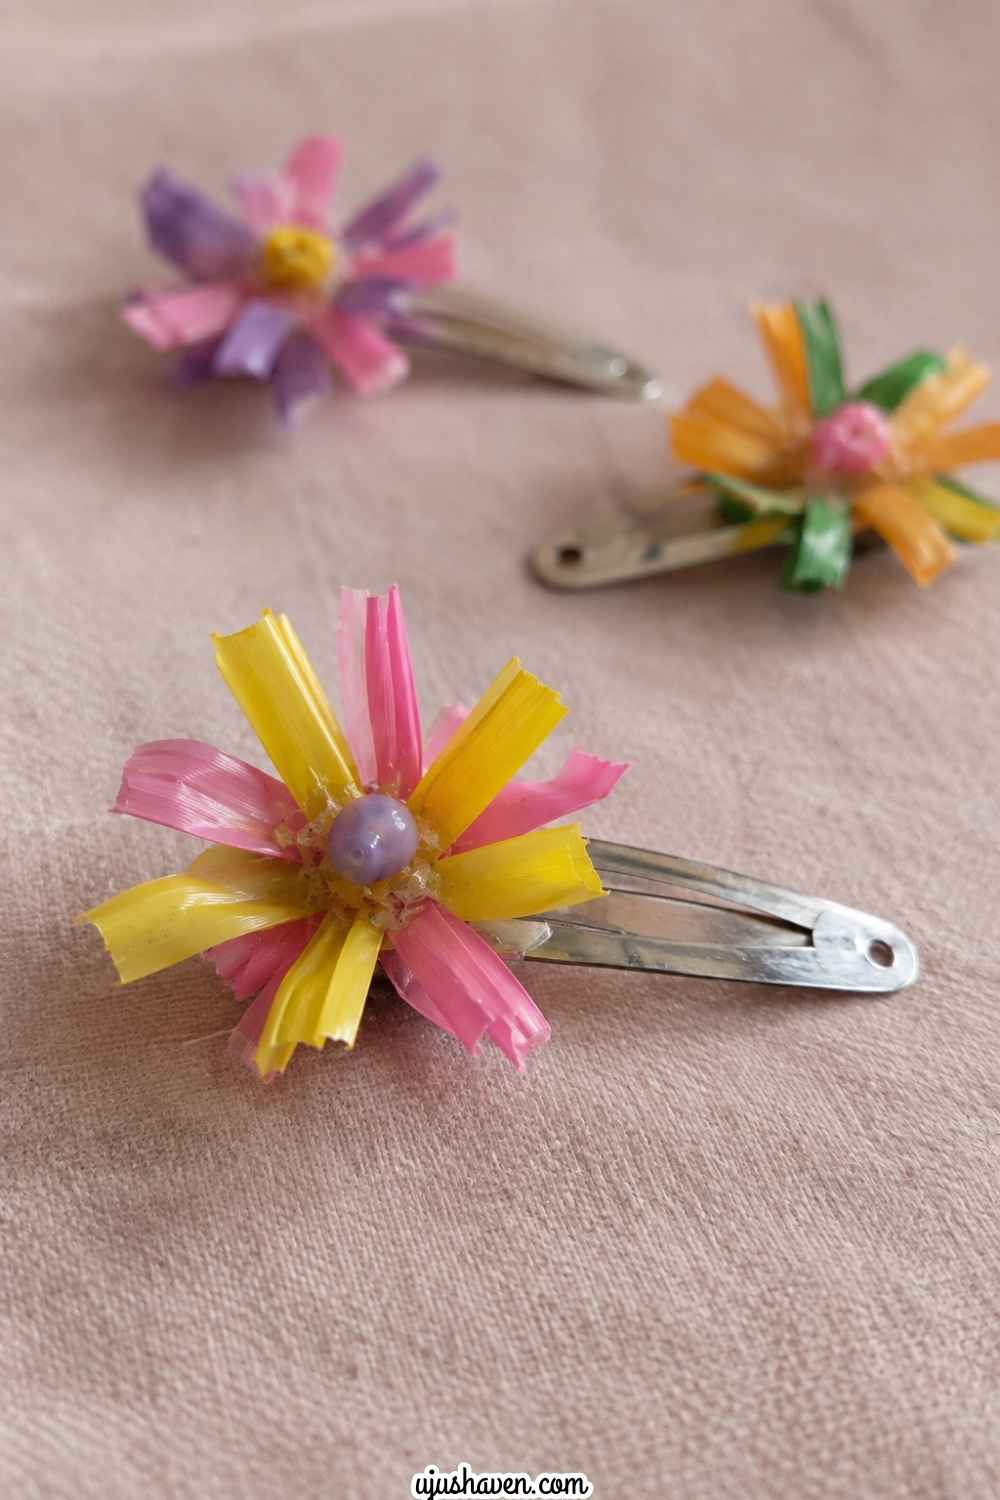
Small and a little delicate, this one doesn’t need a long explanation.
Materials
- Small straw pieces
- Basic hair clips (alligator or snap clips work best)
- Craft glue or hot glue
- Small beads or paper for the center
Make the Tiny Flower
Cut and shape a mini flower using the same petal method as the earlier crafts, just smaller, around 1 inch across works well for a clip.
Attach It to the Clip
Glue the finished flower directly onto the flat top of a plain hair clip and let it dry fully, at least 15 to 20 minutes, before wearing.
A Small Detail That Makes It Cuter
A tiny bead center, two-toned petals, or a slightly layered flower shape adds a little extra polish without much extra effort.
Adult Help
Any hot glue step here is best handled by an adult, since the clips are small and fingers are close to the glue. Craft glue works fine too, it just needs a longer drying time to hold securely.
10. Straw Flower Wands

Give the roundup a little play value here, since this craft turns into a prop instead of a decoration.
Materials
- A finished straw flower
- Wooden craft stick or straw for the handle
- Ribbon
- Glue
Make the Flower
A fuller daisy or sunflower makes a sturdy-looking flower topper that can handle a bit of active play.
Create the Wand Handle
Attach the flower to a sturdy handle, either a wooden craft stick or a thicker rolled straw. If using a straw handle, consider rolling and taping two straws together for extra sturdiness. 15 Easy Popsicle Stick Crafts For Kids They’ll Love Making has more ideas if your child enjoys stick-based projects like this one.
Decorate It
Wrap a bit of ribbon around the handle in a spiral, or add a few extra petals near the base for a fuller look.
After the Craft
Once it’s dry, the wand doesn’t have to sit on a shelf.
It can turn into a prop for pretend play, dress up, or a little garden fairy game, which gives parents of younger kids something to do with the craft once it’s finished.
11. Straw Flower Bookmarks

A cute craft becomes even better when it actually gets used again and again.
Materials
- Cardstock strip, about 2 by 6 inches
- Small straw flower
- Craft glue
- Markers
Make the Bookmark Base
Cut a simple rectangle strip of cardstock in whatever length fits a favorite book, rounding the corners slightly if you’d like a softer look.
Add the Straw Flower
Glue a small flower near the top of the strip, letting a bit of the stem trail down the length of the bookmark. Keep the flower fairly flat so it doesn’t add too much bulk between book pages.
Personalize It
Add the child’s name, a favorite color scheme, or a small drawing along the bottom.
Nice for a Classroom
This one fits right in with summer reading, library activities, or as a small handmade gift for a reading buddy.
If it needs to survive a whole school year of use, laminate the finished bookmark before adding any ribbon or tassel.
12. Straw Flower Picture Frame
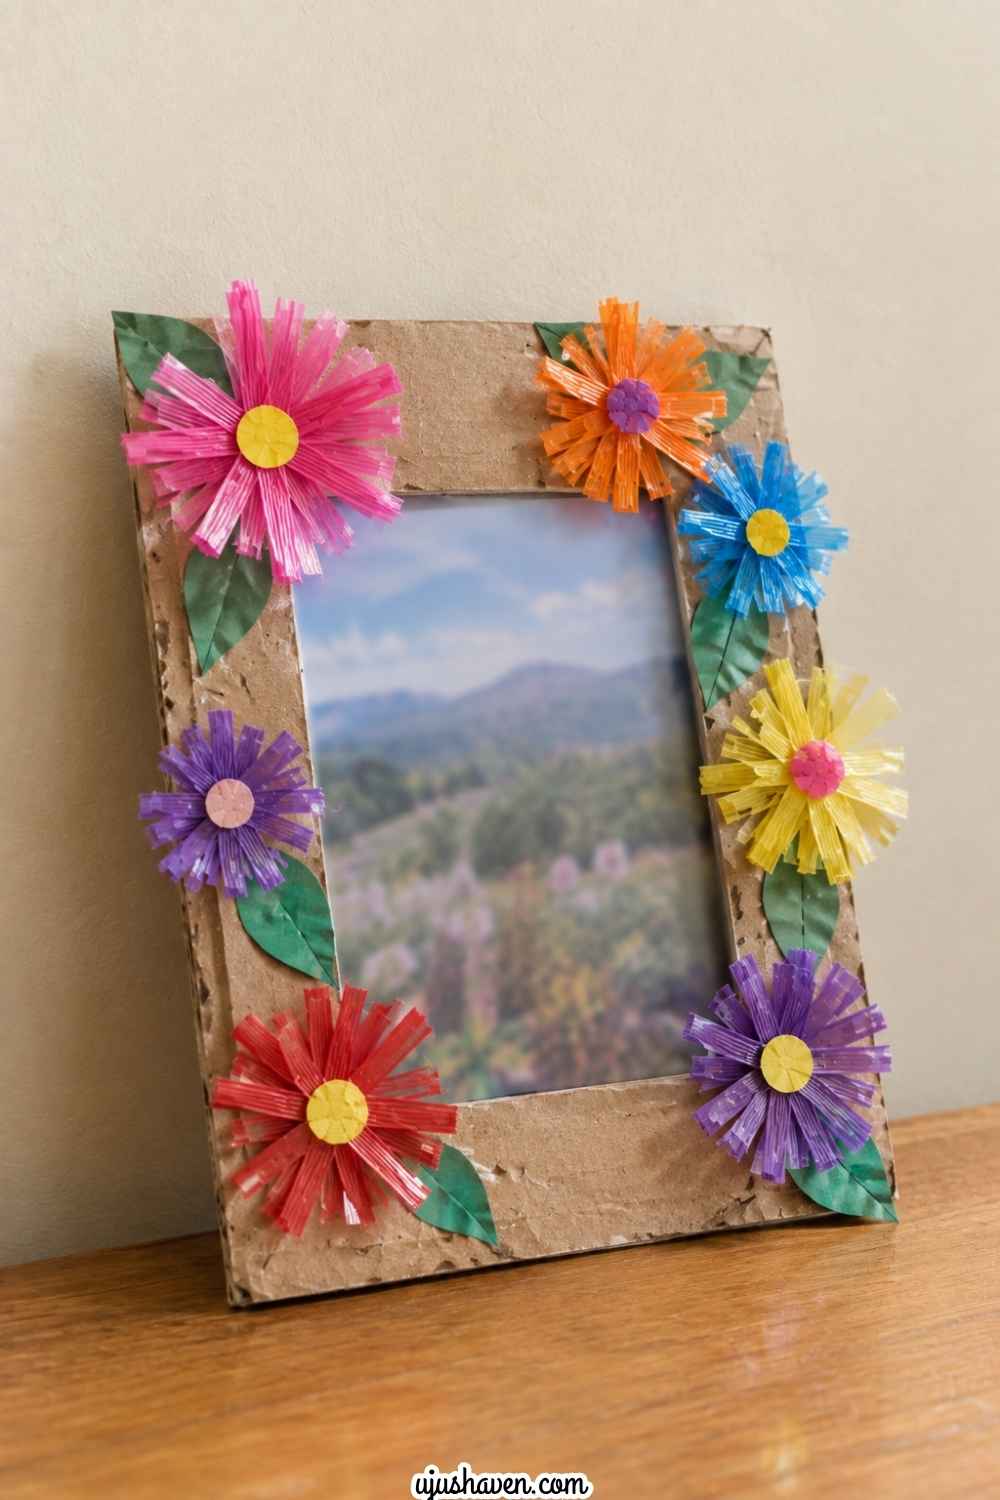
This project turns a handful of little flowers into something worth keeping.
Materials
- Cardboard or a plain craft store frame
- Straw flowers, 8 to 10 for a full border
- Craft glue
- A favorite photo
Prepare the Frame
Use a plain cardboard frame cut with a rectangle opening in the middle, or a simple craft store frame with a flat border.
Make and Arrange the Flowers
Create several small flowers in colors that complement the photo that will go inside. Lay them around the frame border first without gluing, to check spacing and coverage.
Attach Everything
Glue the flowers around the border of the frame, overlapping slightly and filling in gaps with small paper leaves as needed so the frame material underneath doesn’t show through.
Make It Personal
Pairing a favorite photo with colors the child picked themselves gives this project real emotional value, more of a keepsake than just another decoration sitting around.
13. Straw Flower Paper Plate Wreath

With a full ring of colorful flowers, this is one of the boldest Straw Flower Crafts for Kids in the whole bunch, and it makes a bigger display than most of the other projects here.
Materials
- 1 paper plate
- Straw flowers, 12 to 15 for a full wreath
- Scissors
- Craft glue (or hot glue for extra hold)
- Ribbon for hanging
Prepare the Wreath Base
Cut out the center of a paper plate, leaving the outer ring as the wreath base. An adult can help start the cut with scissors before a child finishes it.
Make the Flowers
Prepare a generous number of straw flowers in mixed colors and sizes, since this project looks best when it’s on the fuller side.
Arrange the Flowers
Glue the flowers around the ring, overlapping slightly so the paper plate base doesn’t show through anywhere.
Finish the Wreath
Punch a small hole near the top of the ring, or simply loop and glue a ribbon around the top edge, for hanging.
Since this one starts with a paper plate, it pairs nicely with a few other paper plate projects already on the blog. Paper Plate Watermelon Craft for Kids: Easy, Fun and Budget-Friendly, Paper Plate Ice Cream Craft For Kids, and Paper Plate Sheep Craft for Kids are all worth trying if paper plates have become a favorite base at your craft table.
Display It
This wreath looks right at home on a bedroom door, a playroom wall, a classroom door, or anywhere that could use a little spring cheer.
14. Straw Flower Vase
Making the vase doubles the fun here, since the flowers need somewhere to live once they’re finished.
Materials
- Small cup, jar, or cardboard tube
- Straws for flowers
- Paint, paper, or stickers for decorating the vase
- Glue
- A bit of tape or crumpled paper to hold the flowers upright inside
Make the Vase
Decorate a small container using paint, paper wrap, or stickers, whatever fits the child’s style. Let any paint dry fully before moving on.
Make the Straw Flowers
Make several flowers in different colors and sizes for the arrangement, keeping stems long enough to reach comfortably into the container.
Create the Arrangement
If the container is empty inside, crumple a small piece of paper or lightweight fabric and stuff it in first, this gives the straw stems something to grip onto so they stand upright instead of sliding around.
Insert the finished flowers, adjusting the heights so they don’t all sit at the same level.
Let Kids Design It
Patterns, favorite colors, stickers, or even a name written across the vase all make this feel like a complete, personal little arrangement rather than a leftover craft supply container.
15. Straw Flower Thank You Card and Gift

This is a fitting place to end the roundup, since it gives the whole project a purpose beyond just making something pretty.
Materials
- Straw flower
- Cardstock or a small gift box
- Craft glue
- Marker
Make the Flower
A simple daisy or tulip keeps this project quick, since it already has two steps to it.
Create the Card or Gift
Glue the flower onto a folded card, or attach it to the top of a small decorated gift box, off-center placement tends to look a little more natural than dead center.
Add the Child’s Message
Let the child write or dictate a short thank you note to go along with it, even a couple of sentences works well.
Who Could Receive It?
A teacher, grandparent, parent, caregiver, neighbor, or friend all make good options here.
There’s something a little different about a gift made specifically for someone, especially when the child gets to pick out the colors and details themselves.
Easy Ways to Make These Straw Flower Crafts for Kids Their Own
You don’t need to follow these Straw Flower Crafts for Kids exactly the way they’re written here.
Once a child understands how a straw turns into a petal, the rest is really just decisions they can start making on their own.
Try mixing solid and striped straws in the same flower, or reaching for a flower color nobody would expect, like blue daisies or purple sunflowers.
Some petals can be left long while others are trimmed short, just to see how it changes the look.
Different centers, buttons, beads, torn paper, or a dab of paint can change the personality of a flower more than people expect.
Two flower shapes can even be layered together for something that doesn’t quite match anything in this list.
And any of these flowers can move beyond flowers entirely, turning into a card, a small gift, or a decoration for a room.
If your craft space could use a better system for storing all these straws, ribbons, and paper scraps between projects, take a look at How To Organize Kids Craft Supplies: Simple Systems That Actually Stay Tidy.
Frequently Asked Questions About Straw Flower Crafts for Kids
What age are straw flower crafts suitable for?
Many of these work well for preschoolers and up, especially the daisy and tulip projects. Younger children may need help with cutting straws or using hot glue, while older kids can manage most steps with just a little supervision.
What kind of straws can kids use for flower crafts?
Ordinary plastic or paper drinking straws both work fine. Paper straws tend to hold a curl a bit better, while plastic ones are sturdier for projects like wands or vases. Wider straws also make it easier to cut clean petal shapes, and bendy straws come in handy for anything needing a curved stem, like the tulips.
Are straw flower crafts good for classroom activities?
Yes, particularly the garden collage, bouquet, bookmarks, wreath, and cards. They’re inexpensive to prepare in bulk and don’t require much cleanup, which makes them a practical choice for a group setting.
What can kids do with the straw flowers after making them?
Kids can turn them into cards, bouquets, bookmarks, wreaths, gifts, hair accessories, and decorations. Some can also become pretend play pieces, such as the flower wands.
Can these straw flower crafts be made without hot glue?
Most of them can. Regular craft glue, a glue stick, or double-sided tape work fine for lighter projects like cards, bookmarks, and daisies. Hot glue is really only useful for sturdier pieces like the hair clips or wreath, and that step is best left to an adult either way.
A Little Crafting Can Go a Long Way
A handful of ordinary straws sitting in a kitchen drawer can turn into flowers, cards, gifts, decorations, and a little bit of pretend play, and that’s really the appeal of Straw Flower Crafts for Kids.
Nothing about it needs to be fancy or expensive to feel worth the effort.
Pick whichever one matches your child’s age and patience level, and let them make it their own from there.