Mushroom crafts for adults have a way of showing up right when you’re craving a project that’s relaxing without feeling complicated.
Maybe you’ve been spotting mushroom decor everywhere lately, or perhaps you just love the shape: round, sturdy, a little whimsical, the kind of thing that looks handmade even when it’s simple.
Either way, these whimsical little designs bring a warm, nostalgic feel that’s surprisingly versatile.
Some make thoughtful handmade gifts, while others add a cozy touch to a bookshelf, craft room, or seasonal display.
The best part is that you don’t need advanced crafting skills or expensive materials to make something you’ll genuinely enjoy.
These mushroom crafts for adults range from quick weekend projects to more detailed DIYs, so you can find one that matches both your time and your creativity.
Quick and Easy Mushroom Crafts for Adults You Can Finish in One Evening
This first set is perfect for evenings when you want to start and finish a project in one sitting.
Nothing here needs special tools or a big supply run, just an hour or two and a little patience while things dry.
If this pace sounds like what you’re after, you’ll probably also enjoy these relaxing crafts for adults, which lean into the same low-pressure, self-care mindset.
1. Painted Rock Mushrooms
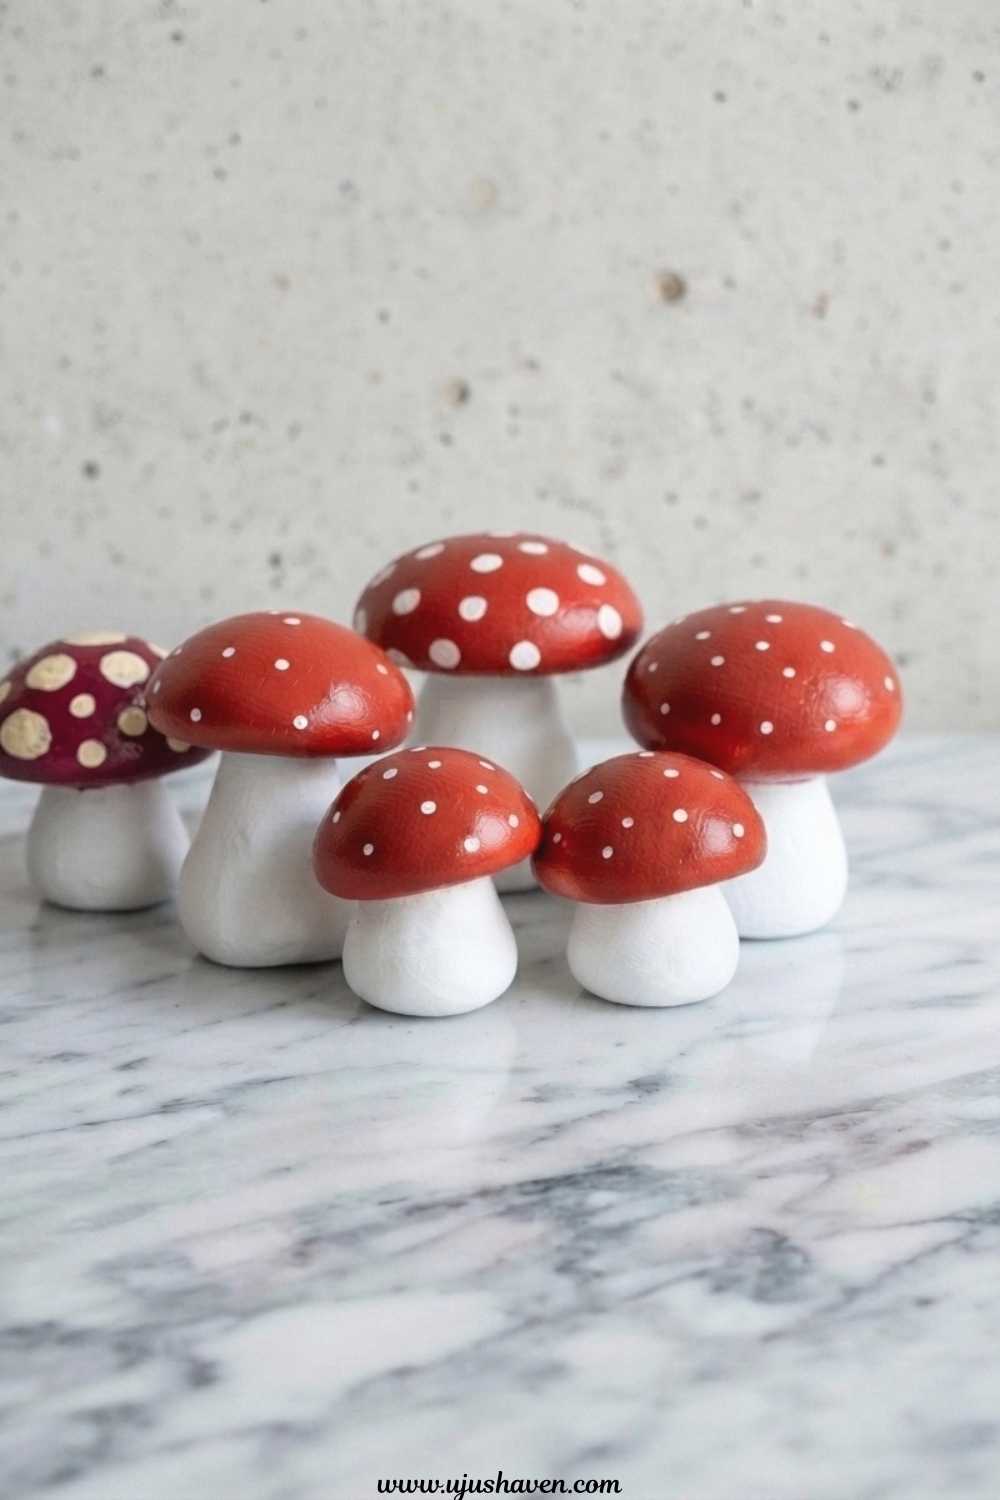
If you’ve never worked with acrylic paint before, painted rock mushrooms are about as forgiving a place to start as it gets.
You’re turning smooth stones from the yard or a craft store into little toadstools with a few coats of paint, and there’s very little that can go wrong.
What You’ll Need:
- Smooth, rounded stones in two sizes (cap and stem)
- Acrylic paint in red, white, brown, or any color you like
- Small paintbrushes
- Matte or glossy sealant spray
- Strong craft glue
Quick How to Make It:
- Wash and dry your stones so the paint holds evenly.
- Paint the larger stone as the cap and the smaller one as the stem, letting each dry fully.
- Add white dots, gills, or texture details once the base coat is dry.
- Glue the cap onto the stem at a slight angle for a natural look.
- Seal with a light spray once everything is dry to protect the color.
If you’re doing this with a group, laying out a few different paint colors ahead of time keeps things moving and lets everyone end up with a slightly different mushroom instead of matching sets.
Flat river stones tend to sit more securely once glued than rounder ones, so it’s worth sorting your stones by shape before you start.
2. Felt Mushroom Garland

Some nights call for something soft and forgiving instead of precise, and a felt mushroom garland fits that mood perfectly.
You’re cutting simple shapes and stitching them by hand, so mistakes barely show, which makes it a nice choice for a night when you’d rather have something relaxing in your lap while you catch up on a show.
What You’ll Need:
- Felt sheets in a few autumn or neutral colors
- Embroidery thread or yarn
- Needle and scissors
- Polyester stuffing (small amount)
- Twine for stringing
Quick How to Make It:
- Cut mushroom cap and stem shapes from felt, two of each per mushroom.
- Stitch around the edges of each piece, leaving a small gap.
- Add a pinch of stuffing for shape, then close the stitching.
- Sew the cap and stem together at a slight tilt.
- Loop each mushroom onto twine, spacing them evenly.
Felt scraps left over from other projects work perfectly here, so this is a good one to keep in mind if you already have a craft bin with bits and pieces you’ve been saving.
Uneven spacing along the twine actually reads as more handmade than a perfectly measured garland, so don’t worry about lining everything up exactly.
3. Watercolor Mushroom Prints
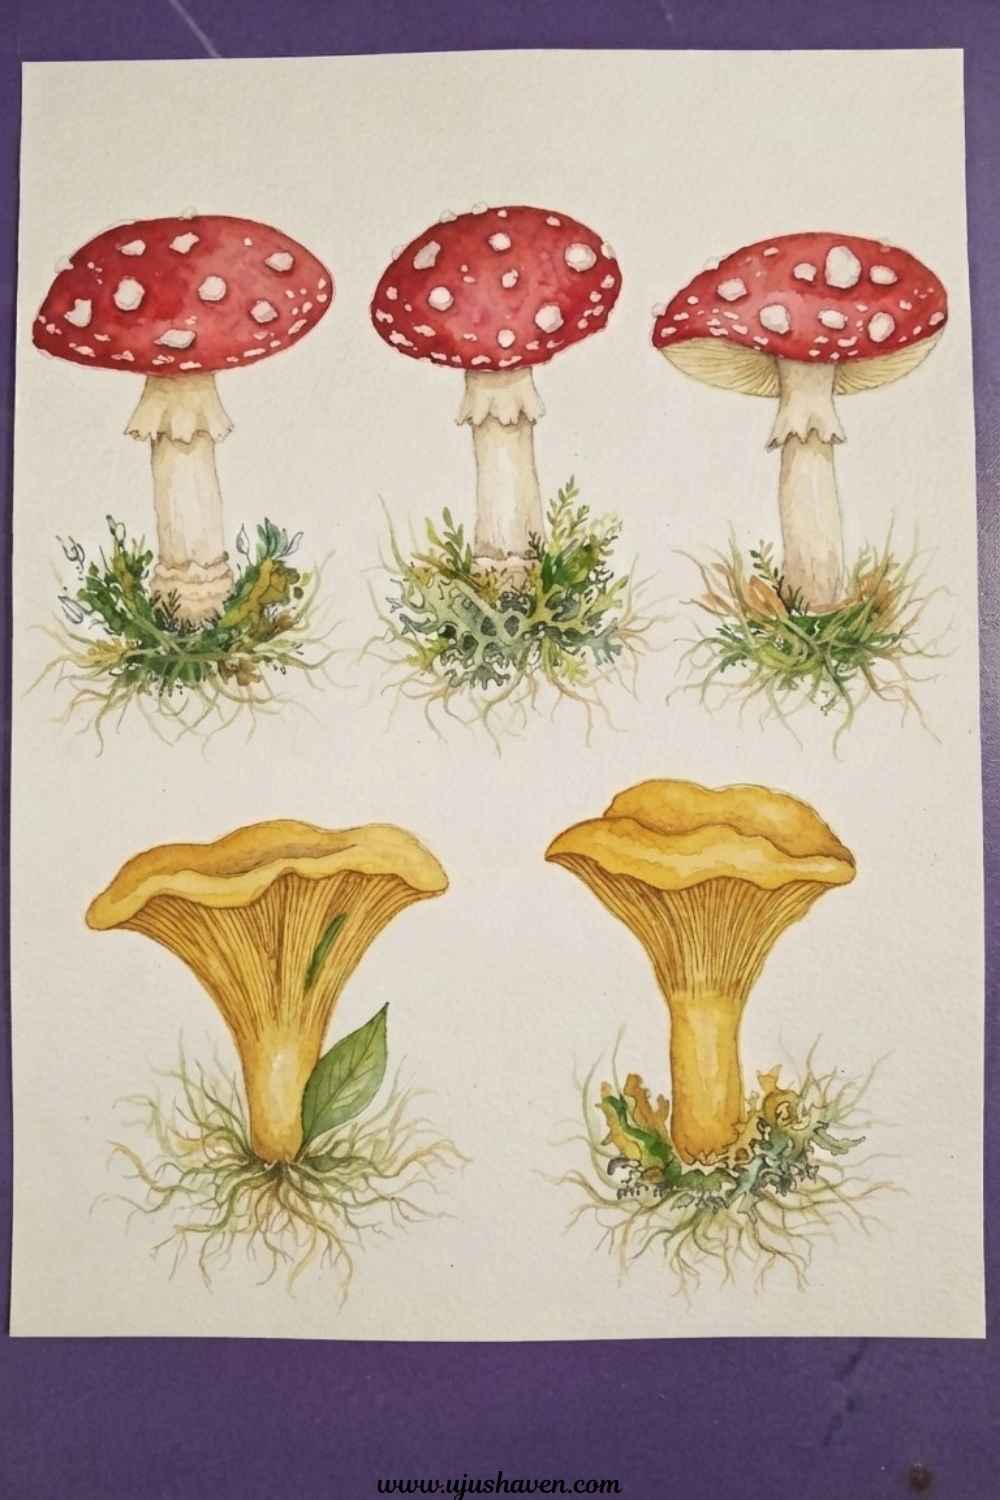
The finished piece looks like it took real skill, even though watercolor mushroom prints mostly just require letting the paint do its own thing.
A rough pencil outline is all the structure you really need, which makes this one feel more like unwinding than crafting.
What You’ll Need:
- Watercolor paper
- Watercolor paints
- Round paintbrush
- Pencil for light sketching
- Water cup and paper towel
Quick How to Make It:
- Lightly sketch two or three mushroom shapes on the paper.
- Wet the cap area slightly, then drop in color and let it bloom naturally.
- Add a thin, controlled stem once the cap has mostly dried.
- Dot in gills or texture with a fine brush.
- Let the paper dry flat before framing or trimming.
Because watercolor is forgiving of imperfect shapes, this is a nice project to do side by side with someone else, since no two prints ever come out looking the same.
If a color bleeds further than you meant it to, let it dry completely before deciding whether it needs fixing; it often settles into something better than planned.
Rustic Mushroom Home Decor Ideas You’ll Want to Display
If you love decor that looks a little rustic and lived-in, this set of mushroom crafts for adults doubles as home accents you’ll actually want to keep out on a shelf rather than tuck away in a drawer.
4. Wood Slice Mushroom Ornaments

When cooler weather has you wanting more natural texture around the house, wood slice mushroom ornaments earn their keep faster than almost anything else on this list.
The wood grain does a lot of the visual work for you, so the painting itself stays simple.
What You’ll Need:
- Small wood slices or wooden beads for stems
- Wood rounds or clay for caps
- Acrylic paint
- Wood glue
- Fine sandpaper
Quick How to Make It:
- Sand any rough edges on your wood pieces.
- Paint the cap portion in your chosen color, leaving some wood grain visible if you like the natural look.
- Add simple dots or gill lines once dry.
- Glue the cap to the stem piece and let it set fully.
- Add a small loop or hook on top if you want to hang it.
Grouping three or four of these in slightly different sizes on a windowsill tends to look more intentional than displaying just one on its own.
Sanding the base flat first also gives you the option to skip the hanger and let them stand upright instead.
5. Air-Dry Clay Mushroom Candle Holders

Anyone who likes decor that doubles as function will appreciate air-dry clay mushroom candle holders, since they’re pretty enough to display and useful enough to actually light.
A finished set on a side table quietly does more work than most decorations that just sit there.
What You’ll Need:
- Air-dry clay
- A small taper candle for sizing the hole
- Sculpting tools or a butter knife
- Acrylic paint or clay glaze
- Sealant spray
Quick How to Make It:
- Shape a rounded mushroom cap and flatten the base slightly so it sits level.
- Press the candle gently into the center to form a snug hole, then remove it.
- Smooth the surface and add texture with a tool or your fingers.
- Let the clay dry fully according to the package instructions.
- Paint and seal once completely dry.
Letting the clay air dry slowly, rather than rushing it near a heater, keeps it from cracking down the middle, which is the most common issue with this project.
A slightly wider base than you think you need also helps the holder stay balanced once a candle is in place.
6. Mushroom Mosaic Coasters

Piecing together small tile fragments has a certain puzzle-like satisfaction, and mushroom mosaic coasters put that feeling to good use.
They take a little longer than most projects on this list, but they turn out sturdy enough for daily use, which makes the extra time feel worthwhile.
What You’ll Need:
- Cork or wood coaster bases
- Small tile pieces or polymer clay scraps
- Tile adhesive or strong craft glue
- Grout (optional, for a finished look)
- Sealant
Quick How to Make It:
- Sketch a simple mushroom shape onto the coaster base.
- Arrange your tile or clay pieces within the outline before gluing anything down.
- Glue each piece in place, working section by section.
- Apply grout between pieces if you’re using it, then wipe away the excess.
- Seal the surface once fully dry.
Keeping the color palette to two or three shades makes the mushroom shape read clearly, even from across the room.
A set of four makes a more natural-looking table setting than mismatched singles collected over time.
Mushroom Crafts for Adults Using Everyday Materials
These ideas lean on supplies you likely already have around the house, so they’re easy on both your time and your budget.
None of these require a special trip to the craft store.
7. Clay Mushroom Trinket Dishes
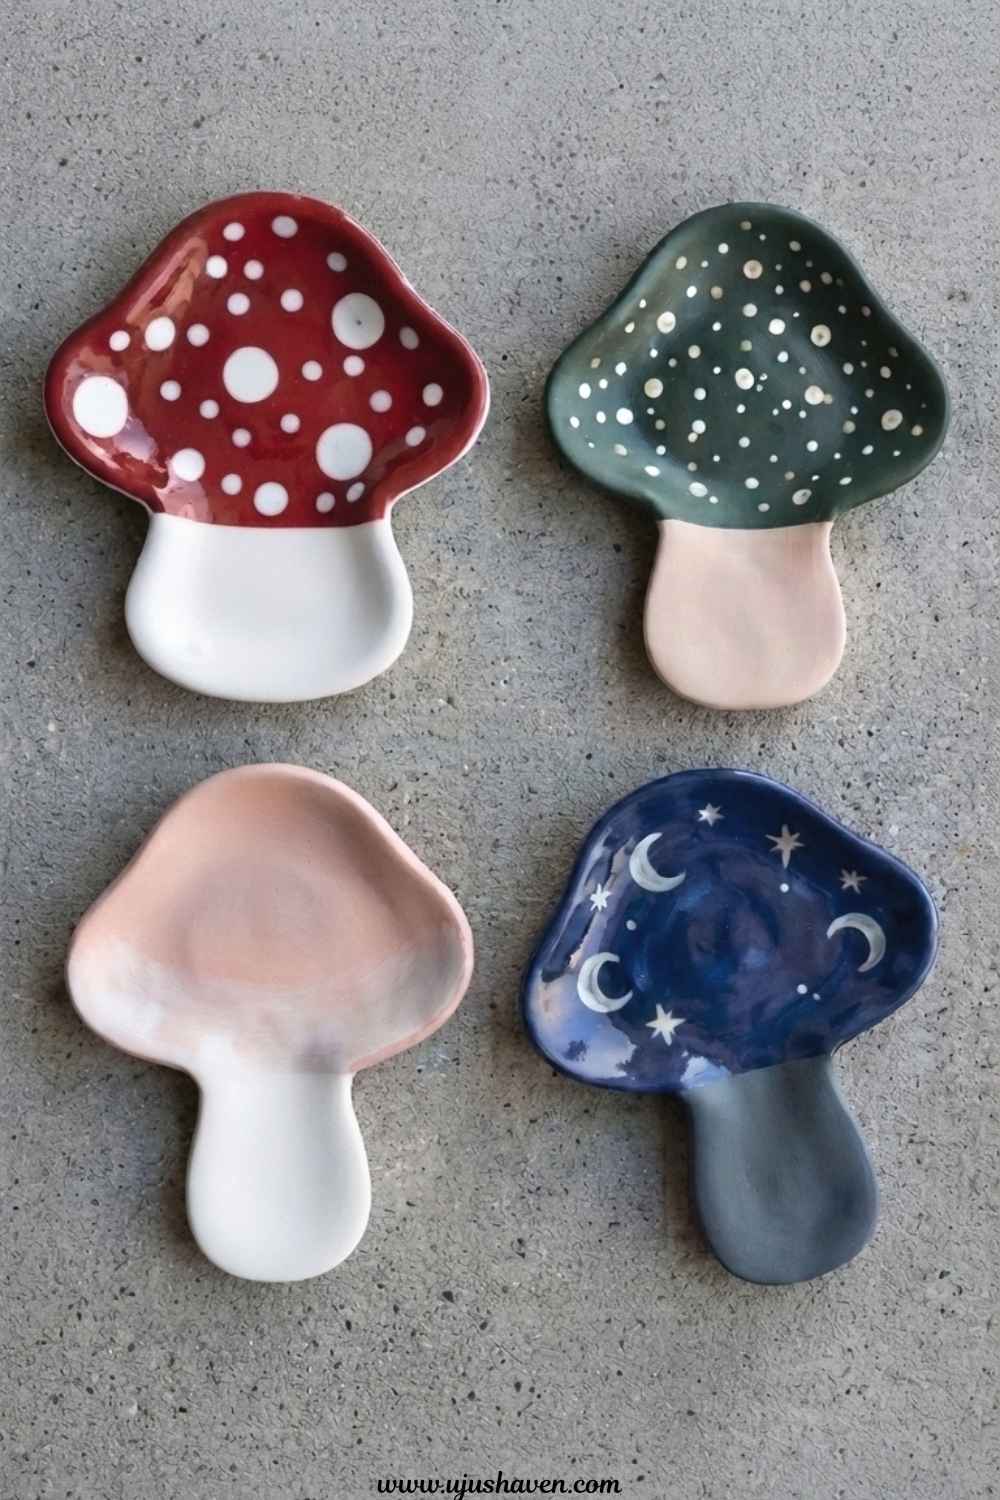
Loose change and stray earrings always seem to end up on the kitchen counter, and a small mushroom-shaped trinket dish solves that in the most charming way possible.
It’s a simple shape, which makes it a good project if you’re newer to clay.
What You’ll Need:
- Air-dry or polymer clay
- A rolling pin or smooth glass
- A small bowl for shaping the dip
- Paint or glaze
- Fine sandpaper
Quick How to Make It:
- Roll the clay to an even thickness.
- Drape it gently over a small bowl to create a shallow dish shape.
- Trim the edges into a rounded mushroom cap outline.
- Let it dry or cure fully, then sand any rough spots.
- Paint with dots or a simple gradient once smooth.
Setting one of these by the front door tends to solve the problem of loose change and stray earrings piling up on the counter.
Rolling the clay slightly thicker than feels necessary also helps it hold its dish shape once it’s fully dry.
8. Paper Mache Mushroom Lanterns

For a project you can spread across several evenings instead of rushing through in one, paper mache mushroom lanterns are worth the patience.
Most of the actual work is just letting layers dry.
What You’ll Need:
- Balloon for the cap shape
- Newspaper strips
- Flour and water paste
- Battery-operated tea light
- Paint
Quick How to Make It:
- Blow up a balloon to your desired cap size and cover it in several layers of pasted newspaper strips.
- Let it dry completely, then pop and remove the balloon.
- Cut a small opening at the base for the light to sit inside.
- Paint the cap and add gills or dots around the opening.
- Place a battery tea light inside once the paint has dried.
Because this one takes a few days between layers, it’s a good project to leave out on a table where you’ll actually remember to add the next coat.
Skip a real flame here; a battery tea light keeps the paper shell completely safe to leave glowing overnight.
9. Mushroom String Art
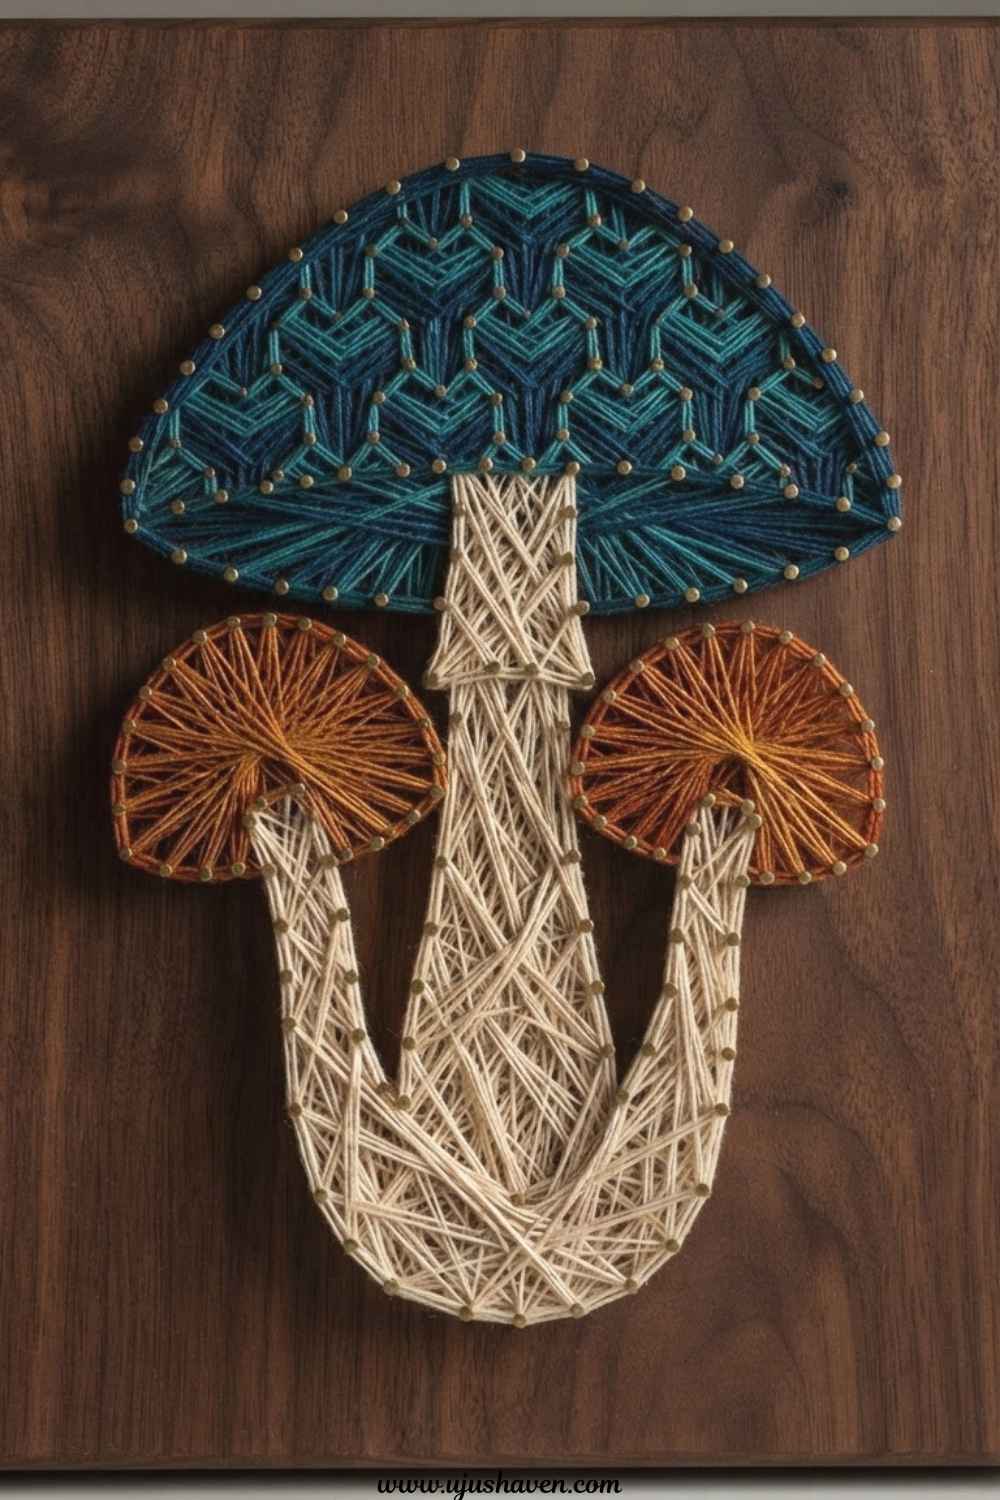
The finished design looks far more complicated than it actually is, which is part of the appeal of mushroom string art.
The process itself is really just repetitive wrapping, which makes it one of the more surprisingly meditative crafts on this list.
What You’ll Need:
- Wood board
- Small nails or pins
- Embroidery thread or string
- Hammer
- Printed mushroom outline (optional, for placement)
Quick How to Make It:
- Tape your mushroom outline to the board and hammer nails along the edge, about half an inch apart.
- Remove the paper once the nails are in place.
- Tie your string to one nail and begin wrapping it back and forth across the shape.
- Continue until the shape feels filled in, adjusting density as you go.
- Knot off the end and trim any excess string.
Working with a lighter thread color against a dark wood board makes the mushroom shape stand out more clearly once it’s finished.
If your nails wobble while hammering, angling them very slightly inward keeps the whole board sturdier once the string starts pulling on them.
Cozy Mushroom Fiber Art Projects for Slow Weekends
For a slower kind of relaxation, this set of mushroom crafts for adults leans into fiber art, the kind of repetitive, soothing work that’s easy to pick up and put down.
If slow, screen-free crafting is exactly what you’re chasing, these mindfulness crafts for adults are worth bookmarking too.
10. Embroidered Mushroom Hoop Art

If your crafting time tends to happen in short bursts rather than long stretches, embroidered mushroom hoop art was practically made for that rhythm.
It’s small enough to carry around and set down whenever life interrupts.
What You’ll Need:
- Embroidery hoop and fabric
- Embroidery thread in a few colors
- Needle
- Water-soluble fabric pen
- Small scissors
Quick How to Make It:
- Sketch your mushroom design onto the fabric with the fabric pen.
- Secure the fabric tightly in the hoop.
- Fill in the cap using satin stitch and outline details with backstitch.
- Add French knots for dots or gill texture.
- Trim excess fabric and secure the back once finished.
Keeping a small hoop project like this near the couch means it’s easy to pick up for ten minutes here and there instead of needing a dedicated craft session.
Leaving the fabric in the hoop even after you’re done stitching gives you an easy, ready-made frame without buying one separately.
11. Crochet Mini Mushrooms
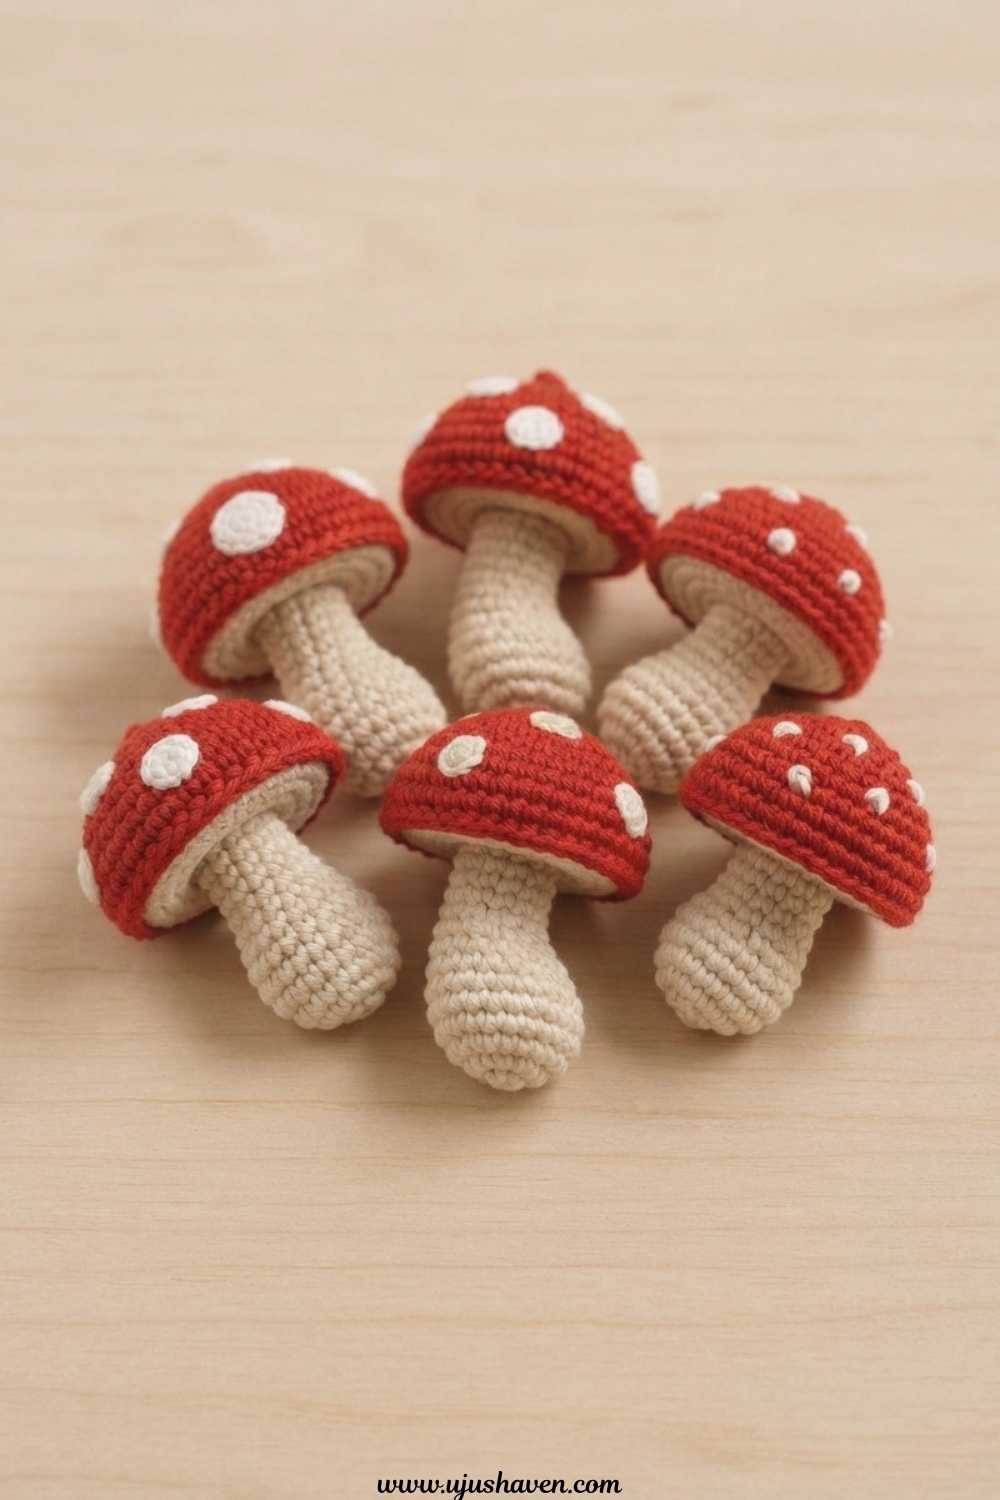
Leftover yarn has a way of piling up in a bin without a real purpose, and crochet mini mushrooms are a satisfying way to finally use it.
They come together quickly once you get the rhythm down.
What You’ll Need:
- Worsted weight yarn in a couple of colors
- Small crochet hook
- Fiberfill stuffing
- Yarn needle
- Stitch marker
Quick How to Make It:
- Crochet a small dome shape for the cap, increasing rounds to build the curve.
- Stuff lightly before closing the top.
- Crochet a straight cylinder for the stem and stuff it as well.
- Add a few surface stitches or dots to the cap for texture.
- Sew the stem to the underside of the cap to finish.
A little basket of these mini mushrooms tends to become one of those decor pieces people pick up and ask about, since they’re tactile in a way that’s hard to resist.
Making a few in slightly different sizes at once looks far more natural grouped together than one mushroom on its own.
12. Macrame Mushroom Wall Hanging

Hung near a window, a macrame mushroom wall hanging catches just enough natural light to feel like a deliberate design choice rather than an afterthought.
The knotting itself is simple enough that you don’t need prior macrame experience to get a clean result.
What You’ll Need
- Macrame cord
- A wooden dowel or ring
- Scissors
- Comb (for fringe texture)
- Tape or a hook to secure your work in progress
Quick How to Make It:
- Cut cords to length and attach them to your dowel using lark’s head knots.
- Work rows of square knots to build the rounded cap shape.
- Taper the knots inward to shape the mushroom stem below.
- Trim the bottom fringe evenly.
- Comb out the fringe for a softer, textured finish.
Hanging this near a window lets the fringe catch a little natural light, which is part of what makes macrame pieces feel so calming in a room.
Trimming the fringe a little at a time, instead of all at once, makes it much easier to keep both sides even.
Thoughtful Mushroom Craft Gifts and Keepsakes
When you want to make something for someone else, these mushroom crafts for adults turn into gifts and keepsakes that feel personal instead of store-bought.
13. Polymer Clay Mushroom Charms

For anyone who likes to have a small handmade gift ready on short notice, polymer clay mushroom charms are worth keeping in your back pocket.
They’re versatile enough to become earrings, keychains, or bag charms depending on what you attach at the end.
What You’ll Need:
- Polymer clay in a few colors
- Sculpting tool or toothpick
- Jump rings and jewelry findings
- Toaster oven or regular oven for baking
- Clay glaze (optional)
Quick How to Make It:
- Shape a small cap and stem from clay, keeping the pieces proportional.
- Add texture with a toothpick before baking.
- Insert a jump ring loop into the top before it bakes, if you’re making a charm.
- Bake according to the clay package instructions and let it cool fully.
- Attach findings once cooled, then glaze if desired.
Making a small batch at once means you’ll have a few finished charms ready whenever a birthday or thank-you gift comes up unexpectedly.
Baking a couple of test pieces first is worth it too, since oven temperatures can run hotter or cooler than the dial suggests.
14. Mini Mushroom Terrarium
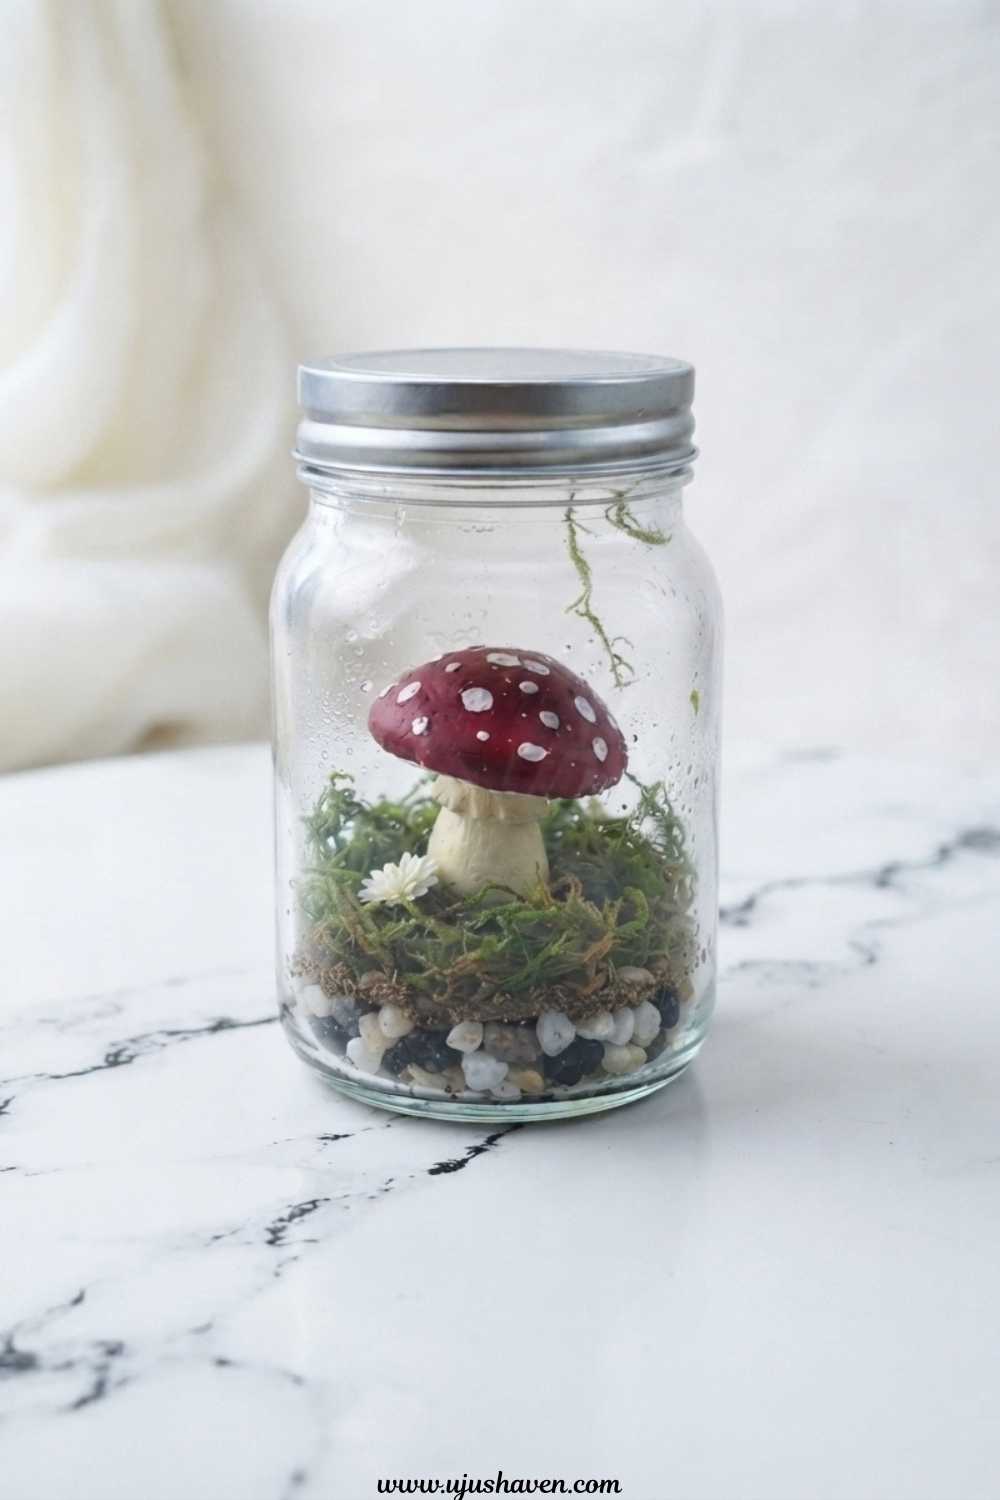
Plant care can feel like one more thing to remember, but a mini mushroom terrarium asks for so little upkeep that it barely counts as a responsibility.
It pairs real greenery with a small handmade clay mushroom tucked inside, making it feel more like a tiny scene than a typical potted plant.
What You’ll Need:
- Small glass jar or container
- Potting soil and moss
- Small air-dry clay mushroom (pre-made or shaped fresh)
- Small pebbles for drainage
- Small tools for placement (spoon, tweezers)
Quick How to Make It:
- Layer pebbles at the bottom of the jar for drainage.
- Add a layer of potting soil on top.
- Press moss over the soil to cover it fully.
- Nestle your clay mushroom into the moss at an angle.
- Mist lightly and place somewhere with indirect light.
Because moss needs very little care, this ends up being a low-maintenance gift for someone who likes greenery but doesn’t necessarily want another plant to remember to water.
A light misting once or twice a week is usually plenty, so it’s worth mentioning that to whoever receives it.
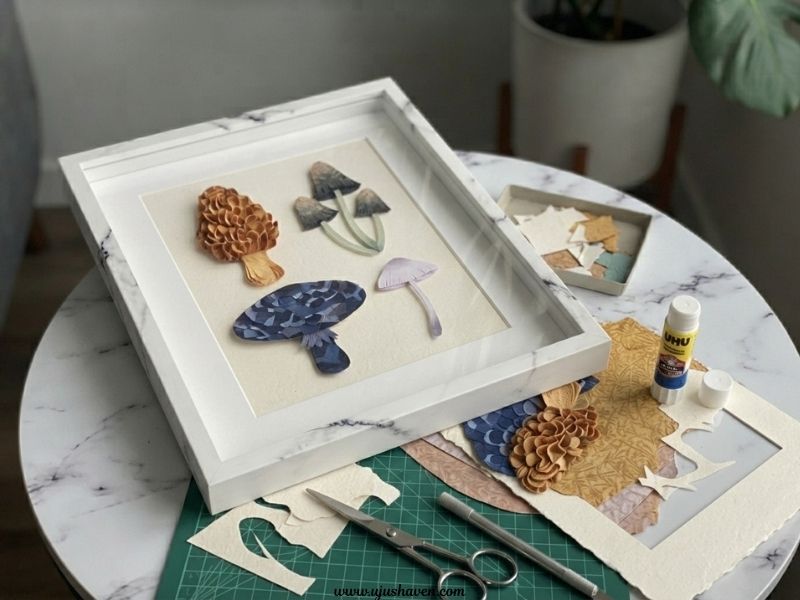
15. Pressed Paper Mushroom Botanical Art
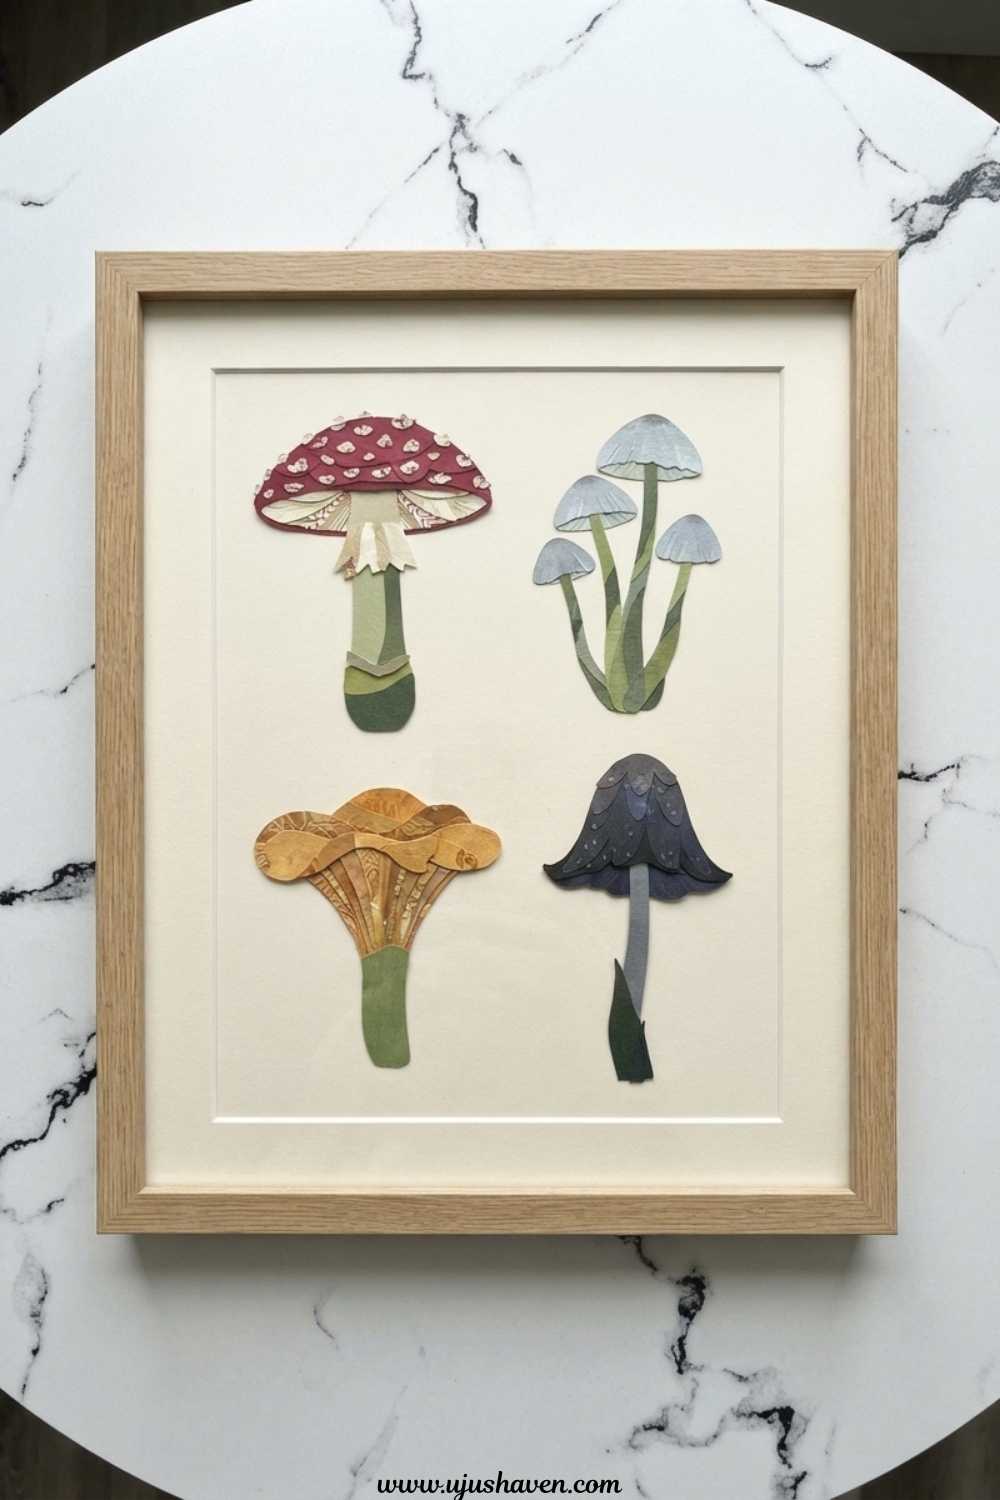
Careful, slow cutting has its own kind of appeal, and pressed paper mushroom botanical art leans fully into that unhurried pace.
It uses cut paper instead of real mushrooms, since fresh mushrooms don’t press or preserve well, but the layered, botanical look still comes through clearly once it’s framed.
What You’ll Need:
- Textured or patterned paper
- Small, sharp scissors or a craft knife
- Cutting mat
- Glue stick
- Frame or mat board
Quick How to Make It:
- Sketch or trace a simple mushroom cap and stem shape onto your paper.
- Cut the shapes out carefully, working slowly around curves.
- Layer two or three paper tones for shading, if you like added depth.
- Glue the layered pieces onto your background paper or mat board.
- Frame once the glue has fully dried.
Cutting a small set of these in different sizes gives you enough for a simple gallery wall grouping instead of just one lone piece.
If your scissors keep catching on tight curves, switching to a craft knife for just those sections makes the edges noticeably cleaner.
Quick Tips for Choosing and Finishing Your Mushroom Crafts for Adults
A few small decisions make the difference between a project that turns out looking intentional and one that feels rushed. Keep these in mind as you work through your list:
- Match the project to your evening. Save painted rocks, watercolor prints, and trinket dishes for shorter windows of time, and save fiber art or paper mache for slower weekends when you can spread the work out.
- Stick to a small color palette. Rust, cream, warm brown, and deep red tend to make separate pieces look like they belong together, even if you made them months apart.
- Let anything wet dry completely before painting. Clay, paper mache, and glue all need full drying time, or the paint can crack or peel once it sets.
- Buy supplies in small amounts first. Most of these projects use far less material than a full craft store kit provides, so a small bag of clay or a single felt sheet usually goes further than expected.
- Display finished pieces in groups of three. Odd numbers and slightly varied sizes read as more natural and collected over time than a single matching set.
Frequently Asked Questions About Mushroom Crafts for Adults
What are some easy mushroom crafts for adults to make?
Painted rock mushrooms, felt garlands, and watercolor prints are the easiest starting points on this list.
All three use basic supplies and don’t require prior experience with paint, clay, or sewing.
Do I need special tools to get started?
Not for most of these. A handful of the ideas here, like painted rocks or embroidery hoop art, only need supplies you likely already have in a craft drawer.
A few, like macrame or paper mache, benefit from one or two inexpensive extras.
Are mushroom crafts good gift ideas?
Yes. Polymer clay charms, candle holders, and mini terrariums all make thoughtful, personal gifts, especially compared to something store-bought, since each one looks slightly different depending on who made it.
How long does a typical mushroom craft take to finish?
It depends on the project. Painted rocks or watercolor prints can be done in under an hour, while clay, paper mache, and macrame pieces often need a few short sessions spread across several days to allow for drying time.
Can I make these without buying a lot of new supplies?
Most of these lean on materials you may already have, like felt scraps, leftover yarn, or spare clay.
A few projects, like the terrarium or macrame hanging, are the exceptions and need one or two specific items.
Bringing It All Together
Whichever ones you try first, these mushroom crafts for adults are proof that a cozy, handmade project doesn’t need to be complicated to feel special.
Some of these you’ll finish in an evening. Others are worth spreading out over a slower weekend.
Either way, a little clay, felt, or paper is really all it takes to bring that soft, woodland feeling into your own home.
If you enjoyed this list, you might also like bumble bee crafts for adults, another easy, low-pressure project idea worth adding to your queue.