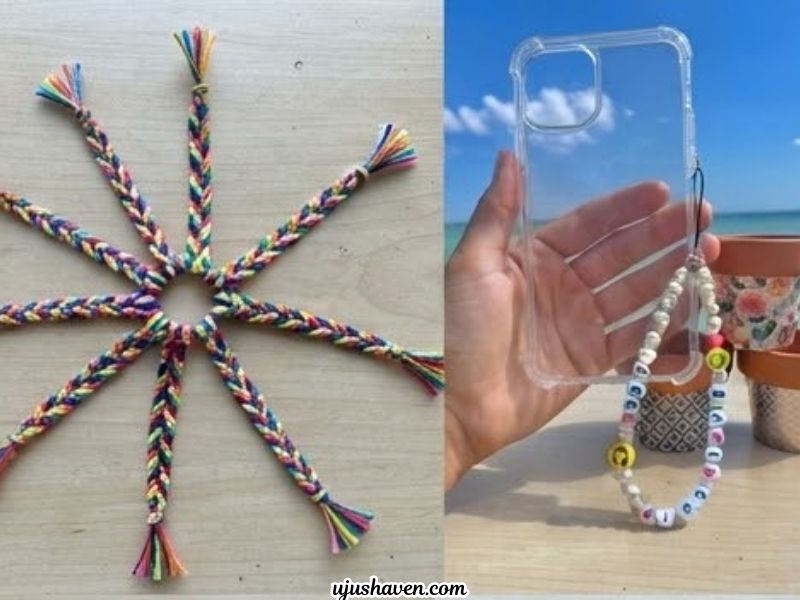
Dollar tree crafts for teens can be surprisingly hard to get right.
Teens have mostly outgrown kid-style crafts, but a lot of “teen” projects either cost far more than expected or call something a dollar-store craft after quietly adding extra supplies.
This list keeps the budget part honest: the projects are built around inexpensive Dollar Tree finds, with a few basic extras you may already have at home, and the supply list stays manageable while still leaving enough style to make a teen want to finish them.
For parents, that means an afternoon of something creative without a big bill or a mountain of cleanup.
For teens, it means projects that can actually fit into a bedroom, become a gift, or feel like something they would choose to make.
There are room decor pieces, wearable projects, gifts, and a few bigger crafts for those days when one small project simply won’t do.
The goal is simple: a full afternoon of crafting without everything looking like it came straight from Dollar Tree.
Now, let’s start with the projects worth picking up supplies for.
Why These Dollar Tree Crafts for Teens Are Actually Worth Making

Most craft roundups aimed at teens fall into one of two traps.
Either they’re too babyish, glitter glue and pom poms dressed up as a “teen” activity, or they quietly stop being budget friendly the moment you add up the supply list.
Dollar tree crafts for teens work because they sidestep both problems.
Here’s what makes this collection different:
- They don’t feel childish. Every project here was picked with a teen’s actual taste in mind, not a watered down version of a kids’ craft.
- They’re cheap enough to experiment with. If a color combo or design doesn’t turn out right, nobody’s out much money trying again.
- Many double as something useful. A finished piece can hold jewelry, organize a desk, or decorate a wall instead of sitting in a drawer.
- They leave room for personal touches. None of these are meant to be followed exactly. Every idea has space for a teen to make it their own.
A teen doesn’t necessarily need another activity that feels like something an adult chose for them.
Sometimes the magic is simply giving them inexpensive materials and enough freedom to make something that feels like theirs.
That’s really the heart of this whole list.
20 Dollar Tree Crafts for Teens to Make, Use, and Actually Love
1. DIY Beaded Room Decor

A plain wall or shelf gets an instant upgrade with this DIY beaded room decor piece.
It uses nothing more than basic Dollar Tree beads and cord, but the finished hanging looks like something pulled from a boutique home shop instead of a craft table.
What you’ll need:
- Beads in a few coordinating colors
- Fishing line or elastic cord
- A small dowel or wire hoop
- Scissors (likely already at home)
How to make it:
- Cut several cord lengths in slightly different sizes so the finished piece has some movement.
- String beads onto each strand, mixing colors and shapes, leaving a little bare cord at the top for tying.
- Tie each strand onto the dowel or hoop with a secure double knot, spacing the strands out evenly.
- Add a loop of cord or ribbon to both ends of the dowel for hanging.
- Trim the bottom of each strand to a slightly staggered length so it doesn’t look too uniform.
- Hang it up and adjust the bead spacing by hand until the drape looks natural.
Make it their own:
Add a few beads in their birthstone color or favorite shade.
Why it works for teens:
It reads as styled decor, not a craft project, and comes together in one sitting.
2. Dollar Tree Canvas Wall Art
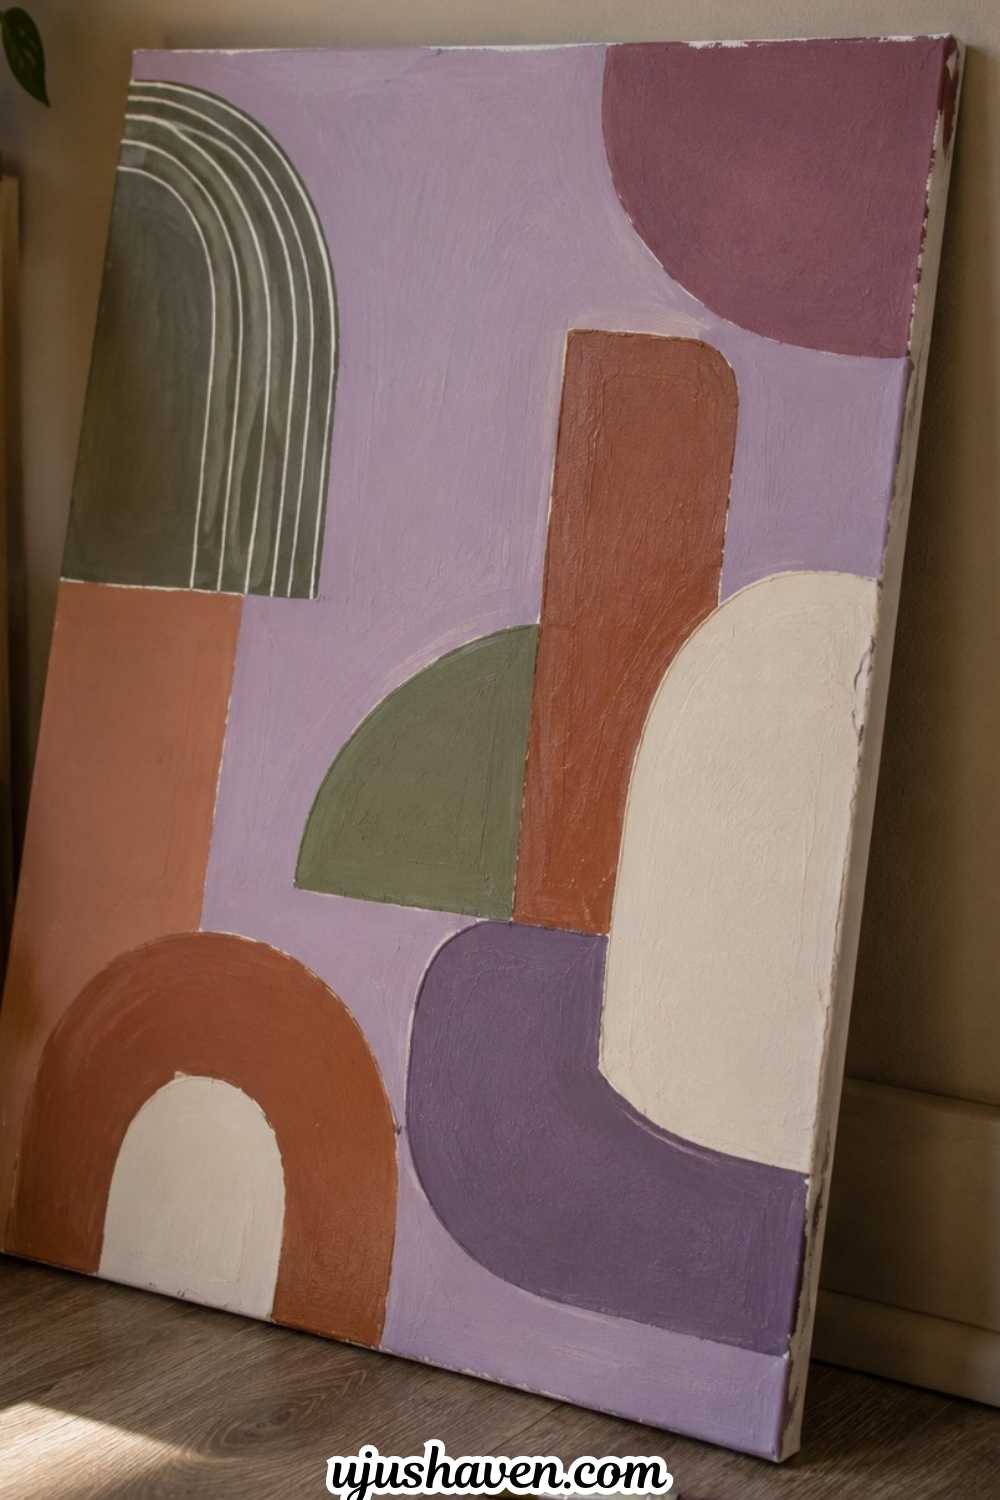
A blank canvas is one of the most flexible projects on this list, since it can be as simple or as detailed as a teen wants.
This Dollar Tree canvas wall art idea uses basic acrylic paint to turn an empty canvas into a piece that feels genuinely personal.
What you’ll need:
- A blank canvas
- Acrylic paint
- Painter’s tape
- Paintbrushes
How to make it:
- Lay the canvas flat and lightly sketch your design in pencil so mistakes are easy to fix.
- Press painter’s tape along any straight edges or shapes you want to keep clean.
- Paint the base color first and let it dry before adding a second coat if needed.
- Add remaining colors one section at a time, letting each dry before starting the next so colors don’t smudge together.
- Peel the tape off slowly while the paint is still slightly tacky, pulling at a low angle.
- Once everything is fully dry, go back in with a small brush for fine details like lines, dots, or lettering.
Make it their own:
Add initials, an abstract pattern, or a favorite lyric.
The teen appeal:
A little paint goes a long way, and the result feels genuinely personal instead of store bought.
If this one gets them excited about painting, 23 DIY Wall Art Ideas To Transform Your Space has plenty more canvas and wall art directions to try next.
3. DIY Trinket Dish

Rings, earrings, and hair clips tend to pile up somewhere on a dresser, and this DIY trinket dish gives them an actual home.
It’s small, quick to make, and genuinely useful, so it tends to be one of the easier crafts on this list to finish in a short afternoon.
What you’ll need:
- A small dish or shallow bowl
- Acrylic paint
- A paint pen for detail
How to make it:
- Wash the dish and dry it completely so paint sticks properly.
- Apply the base coat of paint in thin, even layers, letting it dry before adding more if needed.
- Once the base color is dry, use a paint pen to add a pattern, name, or small design.
- Let the design cure for a while before touching it.
- If you want extra durability, add a suitable clear sealant you already have and let it dry according to the product directions.
Make it their own:
Write their name or initial in the center.
4. Personalized Jewelry Organizer

Tangled necklaces and lost earrings are a real problem in most teen bedrooms, and this personalized jewelry organizer solves it with barely any supplies.
A plain frame and a bit of mesh become a wall-mounted spot for every piece of jewelry to hang untangled.
What you’ll need:
- A small frame or corkboard
- A small piece of mesh or wire grid, use a Dollar Tree option if your store carries one, or repurpose a piece you already have
- Small hooks or pins
How to make it:
- Remove the glass or paper backing from the frame, keeping just the outer frame.
- Cut the mesh or wire grid to fit snugly inside the frame opening.
- Secure the mesh to the back of the frame with a hot glue gun or small staples, working around all four edges.
- Screw or glue small hooks along the bottom edge of the frame for bracelets and rings.
- Let any glue fully set before hanging jewelry on it.
- Mount the frame on the wall with a nail or command strip, or lean it against a wall on a shelf.
Make it their own:
Paint the frame in their favorite color first.
Why it works for teens:
It actually solves the tangled necklace problem.
Looking for more ways to pull the whole room together? 20 Decor Ideas for Teen Bedroom That Instantly Make Any Space Feel Cool and Personal is a good next stop.
5. DIY Decorative Mirror

A plain mirror is one of the easiest items to transform into something that looks pulled straight from a home decor store.
This DIY decorative mirror uses faux flowers or shells to dress up the edges, and it usually ends up being the strongest before and after of the whole list, the kind of piece a teen actually wants to hang somewhere visible.
What you’ll need:
- A plain mirror
- Faux flowers or shells
- Hot glue
How to make it:
- Lay the mirror flat on a protected surface.
- Arrange your shells or faux flowers around the edge without gluing anything yet, so you can adjust the layout.
- Once you’re happy with the spacing, glue one section at a time with a hot glue gun, working around the mirror.
- Press each piece firmly for a few seconds so it sets properly.
- Fill any gaps with smaller pieces once the main layout is glued down.
- Let the glue cure fully before hanging or propping the mirror.
Swapping shells for faux flowers, or mixing both together, changes the entire mood of the piece without changing the process at all.
6. DIY Photo Display Board
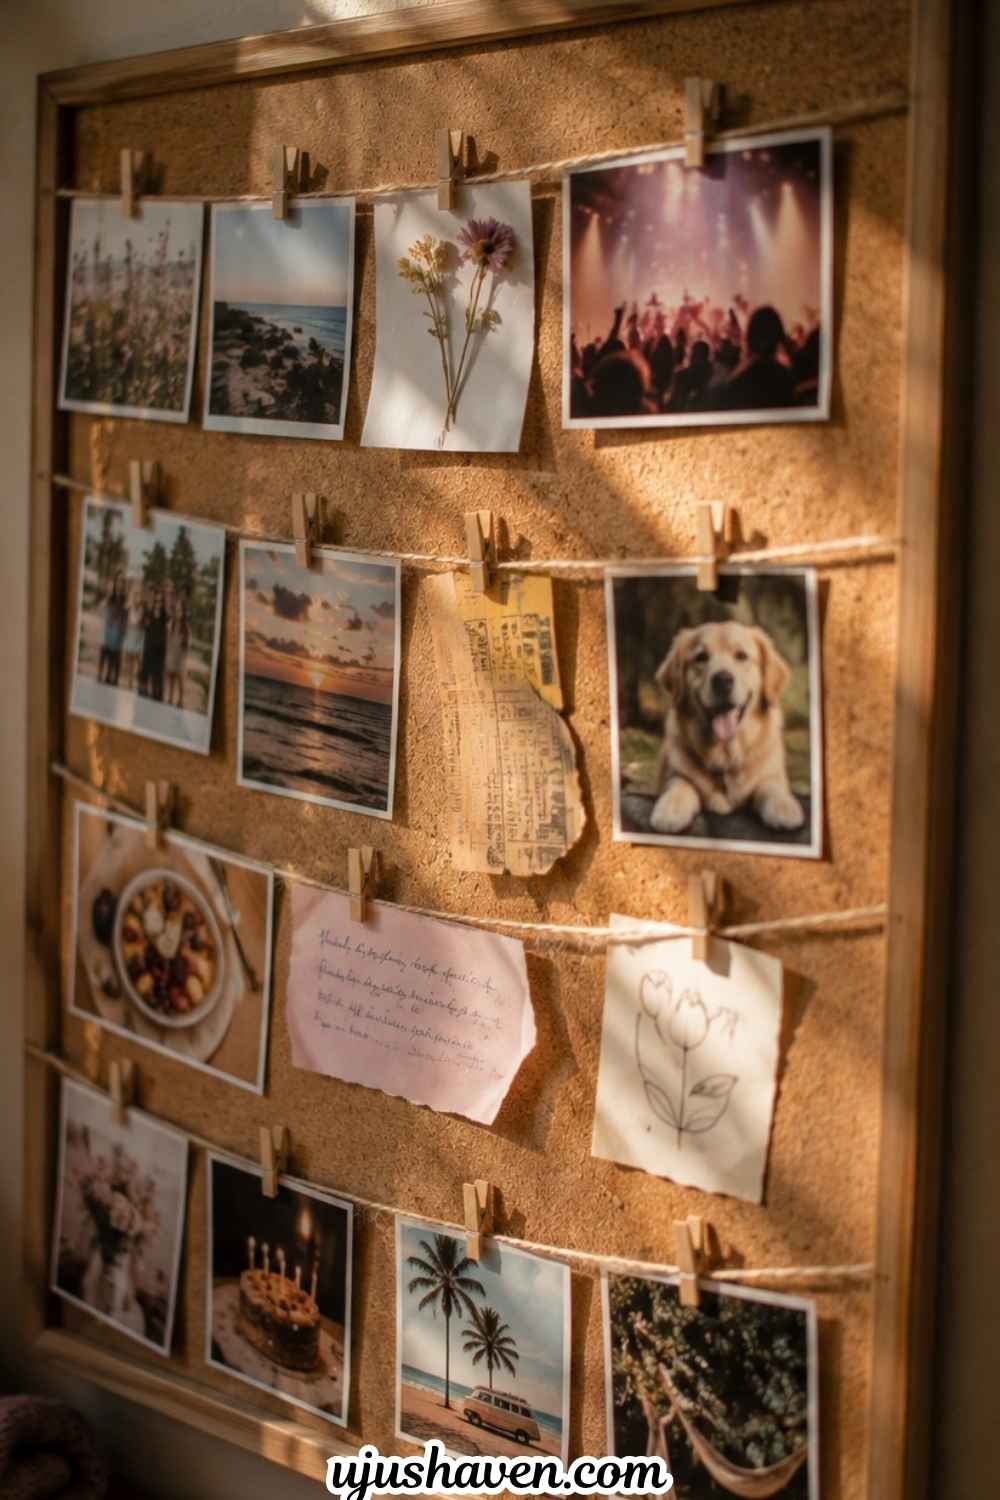
Friends, favorite memories, and concert photos all deserve somewhere better than a phone camera roll.
This DIY photo display board gives a teen an easy way to keep favorite pictures on display.
What you’ll need:
- A corkboard or wire grid
- Mini clothespins or clips
- Twine
How to make it:
- Measure your board or frame and cut twine long enough to string across in even rows, leaving extra at each end.
- Tie or tape each end of the twine securely to the back or sides of the board.
- Space the rows out so photos have room to hang without overlapping.
- Clip photos onto the twine with mini clothespins, spacing them evenly.
- Step back and rearrange until the layout feels balanced.
- Tuck small extras like ticket stubs, notes, or dried flowers between photos for texture.
Make it their own:
Mix in handwritten notes or small drawings between the photos.
Why teens go for this one:
It’s simple to update whenever their taste changes, since nothing is permanently attached.
7. DIY Beaded Phone Charm

A plain phone can become a tiny piece of personal style with a handful of Dollar Tree beads.
This DIY beaded phone charm lets teens play with their favorite colors, initials, names, or little charms to create something that feels completely their own.
It is also quick enough for a quiet afternoon and inexpensive enough to make more than one.
What you’ll need:
- Beads
- Letter beads
- Stretch cord or thin craft cord
- A small jump ring
- Small pliers
- Small charms, if available
- Scissors
How to make it:
- Cut a length of strong cord or wire, long enough to allow for knotting.
- String beads onto the cord in your chosen pattern.
- Tie a secure double knot at one end, then form a small loop at the top for the jump ring.
- Add a small drop of clear glue to the knot for extra hold.
- Once dry, open the jump ring with pliers and attach it through the loop.
- Close the jump ring fully, then clip it onto the phone strap or case loop.
Make it their own:
Let them take the design in whatever direction fits their personality.
They can use favorite colors, spell out their initials, add a tiny charm, or make matching versions for their closest friends.
Why it works for teens:
It is inexpensive, useful, and personal without looking like a little-kid craft.
Better yet, they can change the colors and design whenever their style changes.
8. Personalized Pencil or Makeup Pouch

A plain zip pouch is one of the most practical items on this list, since it’s something a teen will actually carry to school or toss in a bag, and personalizing it makes it feel less like a random school supply and more like theirs.
What you’ll need:
- A plain zip pouch
- Fabric paint or patches
- Small charms
- A scrap of cardboard to slip inside while painting (from home)
How to make it:
- Lay the pouch flat and slide the cardboard inside so paint doesn’t bleed through to the back.
- Lightly sketch your design in pencil or chalk first.
- Apply fabric paint in thin layers, letting each layer dry before adding more.
- Once the paint is dry, glue or sew on patches and charms.
- Let the finished pouch sit flat and cure overnight before using it or packing it in a bag.
Make it their own:
Add their initials or a small doodle that means something to them.
9. DIY Faux Flower Room Decor

Faux flowers can look surprisingly plain on their own, but displayed the right way they read as a styled decor piece instead of an obvious Dollar Tree find.
This DIY faux flower room decor project uses a simple hoop or wood backing to hold everything together.
What you’ll need:
- Faux flowers
- A wire hoop or wood backing
- Hot glue
How to make it:
- Trim flower stems down, just enough to grip while gluing.
- Lay the flowers out on your hoop or backing to plan the arrangement before gluing anything.
- Starting from one point, glue flowers down one at a time, working around the shape.
- Press each flower firmly for a few seconds so the glue sets.
- Fill in any gaps with smaller blooms or a bit of greenery.
- Let the glue fully cure before hanging.
Make it their own:
Shape the flowers into an initial instead of a traditional wreath.
Why it works for teens:
It’s a higher impact, lower effort project than most people expect from faux flowers.
10. DIY Decorative Storage Box
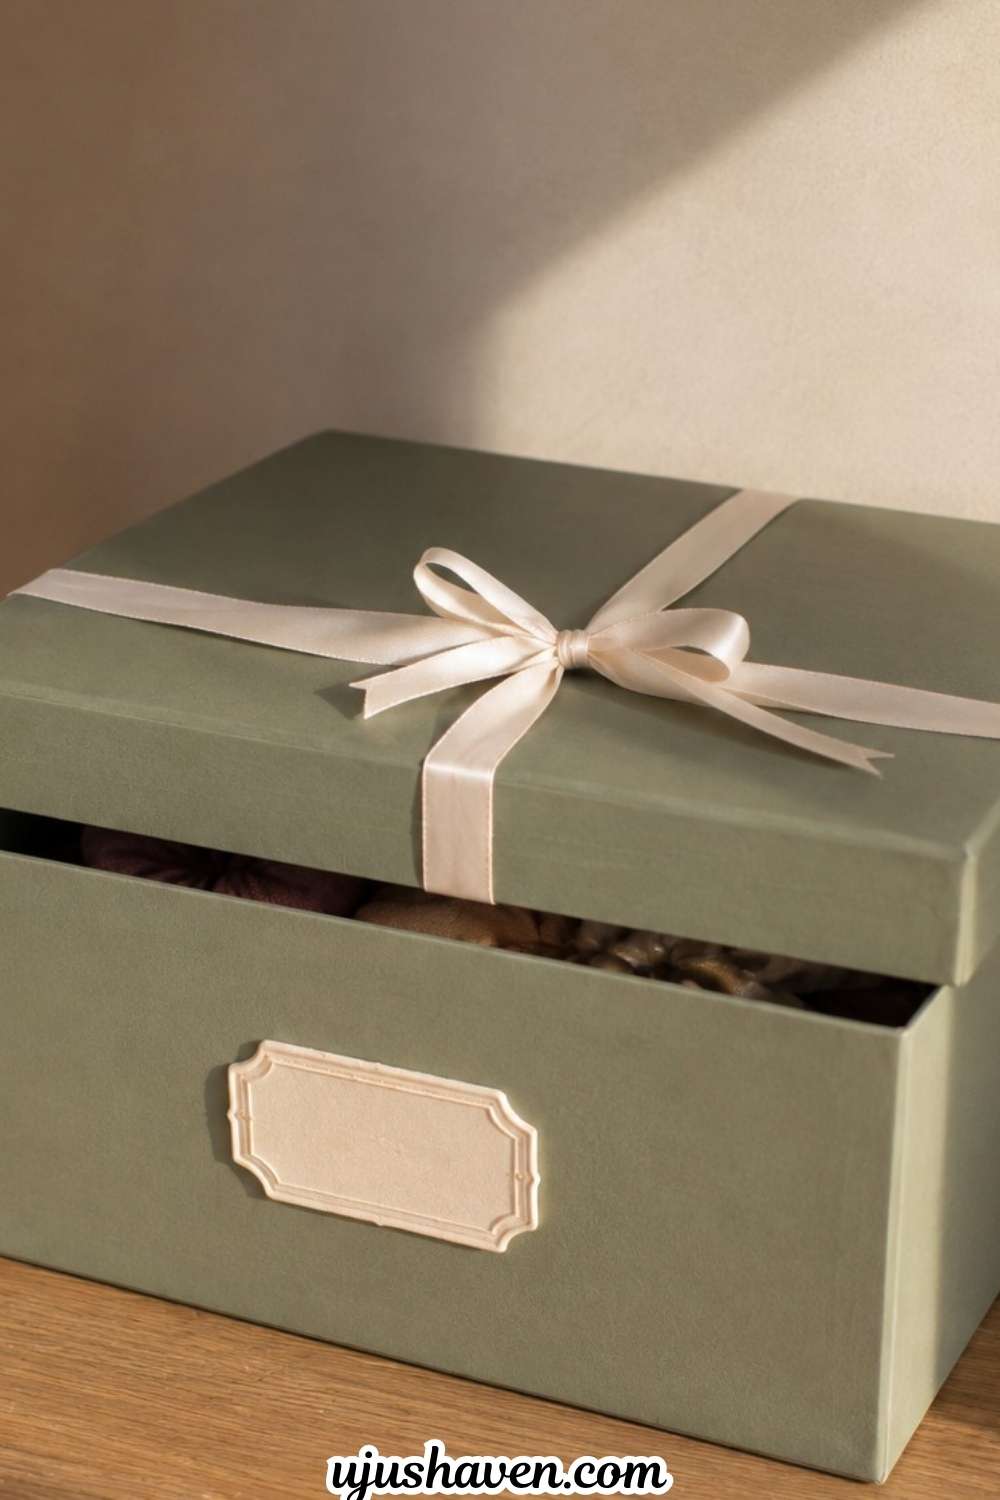
An ordinary storage box rarely looks like much on its own, but a coat of paint and a bit of ribbon can turn it into something that looks like it belongs in a trendy organization shop.
What you’ll need:
- A plain storage box
- Paint
- Ribbon
- A small label
How to make it:
- Remove the lid and paint the box and lid separately in thin, even coats.
- Apply a second coat if the color looks patchy, and let it dry fully.
- Wrap ribbon around the lid or edges, securing the ends with a small dot of hot glue on the underside.
- Write or print a small label naming what’s inside and attach it to the front.
- Add a light coat of clear sealant if the box will be handled often, then let it dry overnight.
Make it their own:
Match the color to the rest of their room.
The appeal:
It’s one of the most dramatic before and afters on this whole list.
11. DIY Friendship Bracelets

Friendship bracelets get a teen appropriate update in this version, trading childhood color combos for a more neutral, layered look.
This DIY friendship bracelets project uses simple beads and cord, but the finished pieces read as jewelry rather than a kids’ craft.
What you’ll need:
- Neutral and letter beads
- Charms
- Elastic or waxed cord
How to make it:
- Pick two or three colors before you start so the bracelet looks intentional rather than random.
- Cut a length of elastic or waxed cord long enough to wrap the wrist twice, plus a little extra for knotting.
- String beads onto the cord in your pattern, placing a charm or letter bead as the focal point.
- Tie a secure double or triple knot once you reach the right length, checking the fit against the wrist first.
- Trim the excess cord close to the knot.
- Add a small drop of clear glue to the knot for extra security.
Making a matching set for a best friend turns a solo project into something shared, which makes it a natural pick for a craft night with friends.
If this one’s going in the craft night pile, 15 Friendship Craft Ideas for Teens to Make Together has more ideas made specifically for a group.
12. DIY Personalized Water Bottle
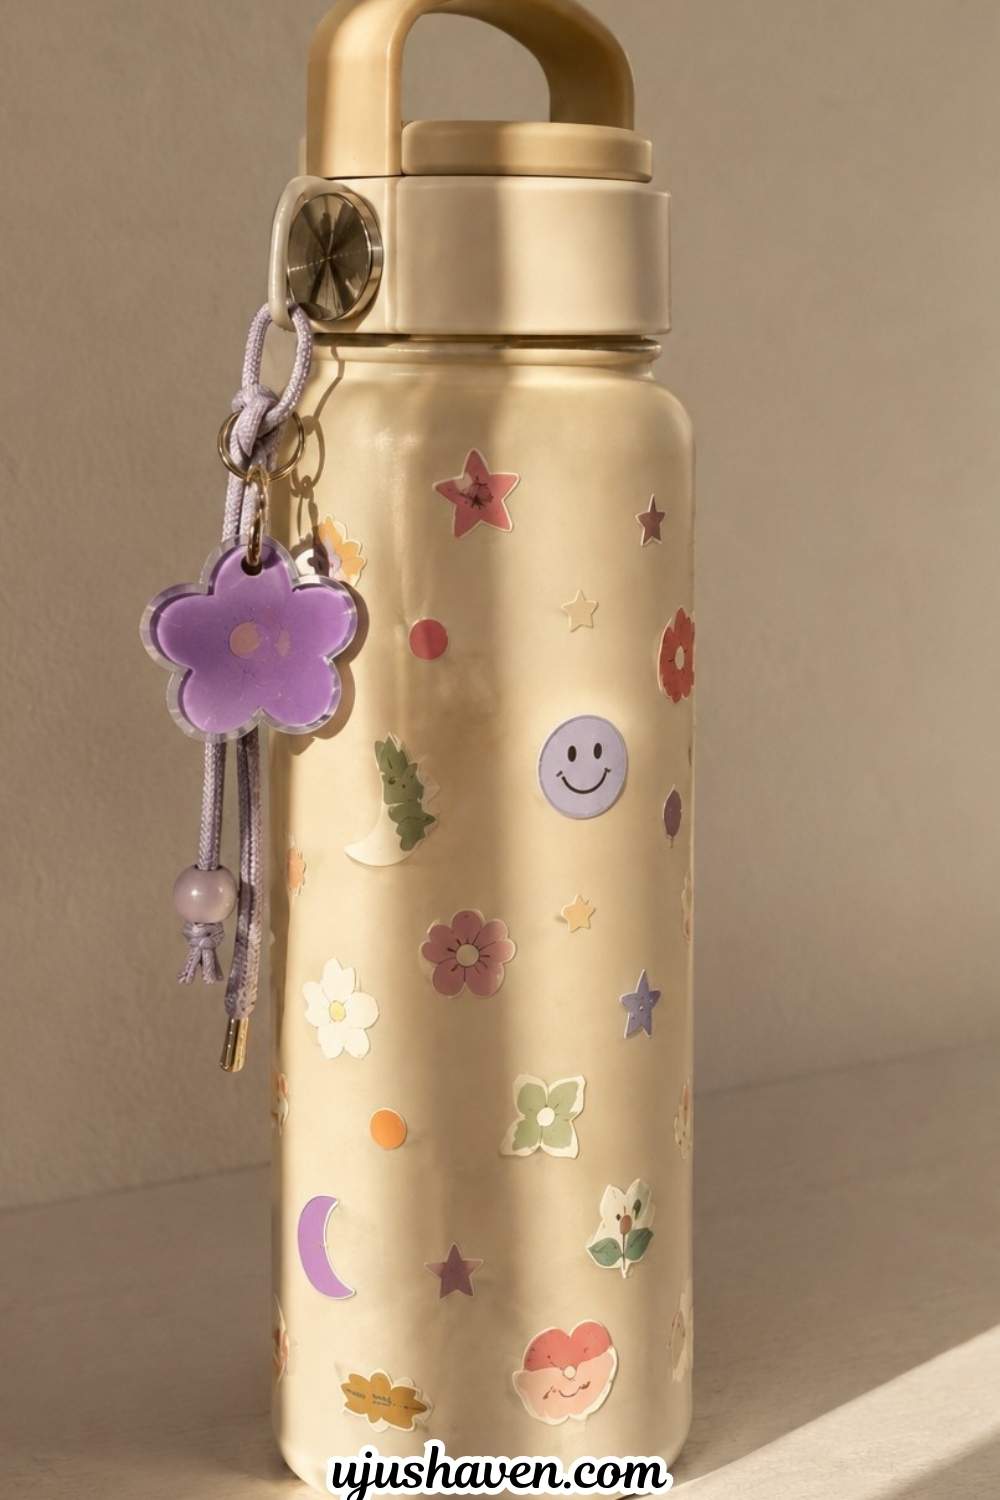
A water bottle is something a teen carries around constantly, so this DIY personalized water bottle ends up being one of the more visible and practical projects on this list.
The personalization gets seen daily instead of sitting unused in a room.
What you’ll need:
- A plain water bottle
- Vinyl stickers or paint pens
- Charms
How to make it:
- Wash the bottle and dry it completely so stickers or paint stick properly.
- Vinyl stickers are the simplest option: press them on slowly from one edge to avoid air bubbles.
- If you prefer paint pens instead, sketch the design lightly first, then go over it in paint, letting layers dry between colors. Follow the paint manufacturer’s drying and curing instructions, and keep painted areas away from the drinking opening.
- Attach a charm to the handle or strap loop if the bottle has one.
Make it their own:
Add their name or a short phrase that feels like them.
13. DIY Dreamy Wall Hanging

This DIY dreamy wall hanging leans into the soft, aesthetic look that tends to do well on a teen’s Pinterest board and their actual wall.
A wood hoop wrapped in yarn or ribbon turns a plain stretch of wall into something worth photographing.
What you’ll need:
- A wood hoop
- Yarn or ribbon
- Faux greenery
How to make it:
- Wrap yarn or ribbon around the hoop, overlapping slightly, until it’s fully covered, then tie off and glue the end.
- Cut several strands of yarn or ribbon about twice the length you want the finished hanging to be.
- Fold each strand in half and loop it around the bottom of the hoop, pulling the ends through to secure it.
- Repeat until the hoop is evenly covered with hanging strands.
- Tuck faux greenery or a few beads into the strands near the top for texture.
- Trim the ends to a slightly staggered length so it doesn’t look too uniform.
Make it their own:
Mix in a small charm or bead that reflects a hobby or interest.
Why it works for teens:
It has that soft, Pinterest-worthy look that instantly upgrades a wall.
Loved how this one turned out? 27 DIY Wall Hanging Ideas That Make Blank Wall Feel Beautiful Again rounds up even more styles to try on another wall.
14. DIY Desk Organizer

A cluttered desk can make homework or creative projects feel more chaotic than they need to be.
This DIY desk organizer turns a few small containers into a coordinated set that keeps pens, brushes, and small supplies in one place.
What you’ll need:
- A few small containers
- Paint
- Glue
- Ribbon
How to make it:
- Wash and dry each container so paint sticks evenly.
- Paint all containers the same base color, doing thin coats and letting each dry.
- Add a matching detail to each piece, like a painted stripe or wrapped ribbon, so the set feels coordinated.
- Let everything dry fully, ideally overnight, before adding pens or supplies.
- Arrange the set together on the desk in a way that makes sense for daily use.
Make it their own:
Label each container for pens, brushes, or small supplies.
Why teens go for this one:
A matching set makes a cluttered desk look coordinated and intentional.
15. DIY Mini Memory Jar
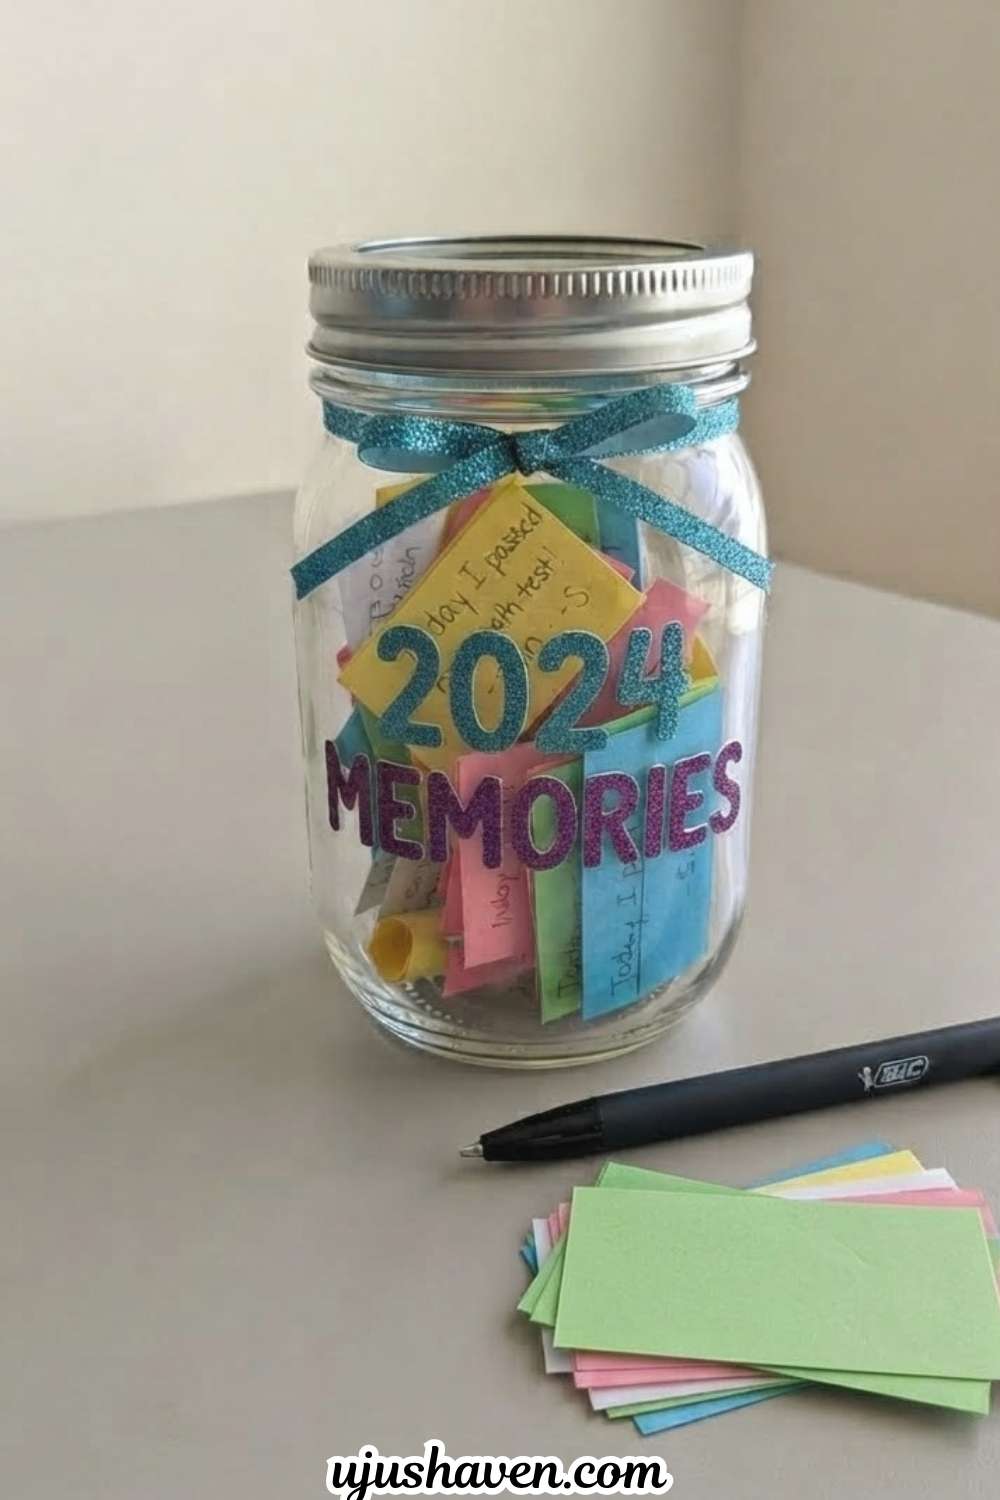
Not every project on this list needs to be purely visual, and this DIY mini memory jar brings a little emotional depth into the mix.
A simple glass jar becomes a place to keep memories, goals, or things they’re grateful for instead of just sitting on a shelf, and adding one note a week turns it into a habit worth keeping up.
What you’ll need:
- A small glass jar
- Paper slips
- A pen (likely already at home)
- Ribbon
How to make it:
- Clean the jar and let it dry completely.
- Decorate the outside with ribbon, paint, or a label, keeping it simple so notes are still easy to see through the glass if you’d like.
- Cut a stack of small paper slips for writing on.
- Write a handful of starter notes, memories, or things they’re grateful for, and drop them in to get started.
- Keep the jar somewhere visible, like a desk or shelf, as a reminder to keep adding to it.
Have a spare lid lying around too?Mason Jar Lid Craft: Easy Last-minute DIY That Instantly Warms Your Space is another quick jar project worth trying.
16. DIY Personalized Picture Frame

A basic Dollar Tree frame rarely has much personality on its own, but this DIY personalized picture frame changes that completely.
Shells, beads, or paint give the frame a new look, and it’s ready to hold a favorite photo once it’s finished.
What you’ll need:
- A plain frame
- Shells or beads
- Paint
- Hot glue
How to make it:
- Remove the glass and backing from the frame before decorating.
- Paint the frame in thin coats, letting it dry fully between layers.
- Lay out shells, beads, or other decorative pieces around the frame edge before gluing anything down.
- Glue pieces on one section at a time, pressing firmly for a few seconds each.
- Let the glue cure fully before reassembling the frame.
- Add a favorite photo and put the glass and backing back in place.
Make it their own:
Match the frame’s decor to the photo inside it.
Why it works for teens:
It gives them somewhere personal to display a favorite photo.
17. DIY Cute Hair-Accessory Holder

Scrunchies, clips, and headbands tend to end up scattered across a dresser without a real home.
This DIY cute hair-accessory holder finally gives them one, using a simple dowel or ring holder dressed up with paint and hooks.
What you’ll need:
- A small dowel or ring holder
- Paint
- Hooks
How to make it:
- Paint the dowel or base piece in thin, even coats, letting it dry fully between layers.
- Mark even spacing along the piece for hooks before attaching anything.
- Screw or glue small hooks or pegs into place at each mark.
- Let any glue set fully before adding weight to the hooks.
- Mount the piece on the wall with a nail or command strip, or set it upright on a dresser.
- Hang scrunchies, clips, and headbands once it’s fully secure.
Make it their own:
Paint it to match their existing room colors.
18. DIY Decorative Candle Holder

This DIY decorative candle holder adds a cozy, styled detail to a room without an open flame to worry about.
A small glass jar or votive holder gets dressed up with twine or paint, then holds a battery-operated candle instead of a real one.
What you’ll need:
- A small glass jar or votive holder
- Paint or twine
- A battery-operated candle
How to make it:
- Wash the jar or votive holder and let it dry completely.
- If wrapping twine, start at the base and wind it upward, securing the end with a small dot of glue.
- If painting instead, apply thin coats and let each layer dry before adding the next.
- Let the finished piece cure fully before handling it.
- Place a battery-operated candle inside rather than a real flame, since this piece is meant to be decorative.
Make it their own:
Wrap the twine in a pattern that matches other room decor.
The appeal:
It’s cozy and styled without an open flame to worry about.
19. DIY Gift Basket or Self-Care Gift Set

This DIY gift basket or self-care gift set flips the script and lets the teen be the gift giver instead of the one receiving a craft.
A small basket or container becomes a thoughtful gift for a friend, sibling, teacher, or parent.
What you’ll need:
- A small basket or container
- Ribbon
- A few inexpensive treats or self-care items
How to make it:
- Line the basket or container with tissue paper or fabric scraps as a base.
- Decorate the outside with ribbon or paint if it needs a personal touch.
- Choose a simple theme, like self-care, snacks, or a favorite color, so the items feel cohesive rather than random.
- Fill the basket with a few coordinating items, arranging taller items toward the back.
- Add a handwritten note tucked into the front for a personal touch.
Make it their own:
Build it around the recipient’s actual favorite things.
Why it works for teens:
It lets the teen be the gift giver for once.
Making this one for a birthday specifically? Sweet 16 Birthday Party Activities Teens Will Actually Love has more ways to make the day feel special.
20. DIY “Designer-Look” Room Decor Makeover

This DIY designer-look room decor makeover is the biggest project on the list, turning a handful of smaller crafts into one coordinated set.
Instead of one small project, a teen picks two or three ideas from earlier in this list and ties them together with a shared color palette, and the result reads as one intentional look rather than several separate crafts.
What you’ll need:
- Two or three items from this list, like a mirror, storage box, and desk organizer
How to make it:
- Choose two or three projects from earlier in this list, like a mirror, storage box, and desk organizer.
- Pick one color palette and a repeating material, like the same ribbon or beads, to use across all of them.
- Decorate each piece separately, following its individual steps above, but keep the colors and details consistent throughout.
- Let everything dry and cure fully before combining the pieces.
- Group the finished set together in the room so they read as one coordinated look.
Make it their own:
Build the set around a color or theme already in their room.
How to Make Dollar Tree Crafts Look More Expensive
Getting the “looks way more expensive” part right isn’t about buying nicer materials. It comes down to a few styling habits that apply to nearly every project on this list.
- Stick to a small color palette. Two or three colors almost always read as more intentional than five or six random ones.
- Repeat one material across pieces. Using the same beads, ribbon, or metallic accent on more than one project ties everything together.
- Hide the cheap-looking parts. Clean edges and covered seams make a bigger difference than most people expect.
- Don’t overdecorate. One of the easiest ways to keep a craft looking polished is knowing exactly when to stop adding to it.
- Add personalization. Initials, names, or a meaningful color make a piece feel intentional instead of generic.
- Create matching sets. Three coordinated pieces almost always look more expensive than three unrelated ones.
These habits work for dollar tree crafts for teens specifically because teens tend to notice when something looks thrown together.
A little consistency goes a long way.
Easy Dollar Tree Craft Supplies to Keep on Hand
Building a small stash of go-to supplies makes it easy to start a new project any time, without a fresh shopping trip.
- Blank canvases
- Glass jars
- Frames
- Ribbon
- Beads
- Faux flowers
- Craft paint
- Paintbrushes
- Glue
- Wooden pieces
- Yarn
- Stickers
- Storage containers
- Decorative paper
- Letter beads
A handful of these basics can stretch across several projects on this list, which makes the whole hobby even more budget friendly over time.
Turn These Dollar Tree Crafts Into a Teen Craft Night
A craft night doesn’t need a long list of activities. It just needs a simple formula.
Pick two crafts, add snacks and music, and set aside a phone-free hour.
- For one teen: Choose a room decor project they can work on solo.
- For two or more teens: Friendship bracelets, photo displays, or personalized accessories work well together.
- For a birthday: Personalized gifts or a room decor piece make it feel special.
- For a rainy afternoon: Pick something that can realistically be finished in under two hours.
For the full playbook on pulling one of these together, How to Host a Girls Craft Night That Nobody Wants to Leave walks through everything from setup to snacks.
With a plan like this, dollar tree crafts for teens go from a solo activity to something the whole friend group can do together.
Which Dollar Tree Craft Should Your Teen Try First?
With 20 Dollar Tree Crafts for teens on this list, picking a starting point can feel like the hardest part. This quick guide should help.
| If they want… | Try… |
|---|---|
| Something for their room | Decorative mirror |
| Something useful | Desk organizer |
| Something trendy | Phone charm |
| Something sentimental | Memory jar |
| Something to give a friend | Friendship bracelets |
| Something creative | Canvas wall art |
| Something for a craft night | Photo display board |
| A bigger project | Room decor makeover |
Whatever fits their mood is a solid place to begin. There’s no wrong order to work through this list.
Frequently Asked Questions About Dollar Tree Crafts for Teens
What crafts can teens make from the Dollar Tree?
Teens can make room decor, jewelry, organizers, gifts, and small accessories using basic Dollar Tree supplies like beads, frames, canvases, and storage containers. The trick is picking projects with clean, simple styling instead of ones that look like a kids’ craft.
How much do Dollar Tree crafts for teens cost to make?
Most of these projects use just a handful of Dollar Tree items, so the cost stays low overall, though the exact total depends on how many pieces you’re making and what you already have on hand. Building a small reusable supply stash, like the one further down this post, keeps future projects even cheaper.
What Dollar Tree items are good for teen room decor?
Frames, mirrors, canvases, storage boxes, and faux flowers are some of the best Dollar Tree finds for teen room decor. On their own they look plain, but paint, beads, or ribbon can turn them into something that fits a teen’s actual style.
Are Dollar Tree crafts good for a teen craft night?
Yes, Dollar Tree crafts work well for a craft night because the low cost means everyone can try a project without worrying about wasted supplies. Friendship bracelets, phone charms, and photo displays tend to work best for a group.
What supplies do I need to start Dollar Tree crafts for teens?
A small stash of paint, glue, ribbon, beads, and a few blank items like canvases or frames covers most of the projects on this list. Building that stash once means a teen can start a new project any time without another shopping trip.
Final Thoughts on Dollar Tree Crafts for Teens
Crafting isn’t just about filling an afternoon.
For a teen, it can be a chance to make something with their own hands, express their personality, decorate their space, or create something for someone they love.
It’s also a break from scrolling, and sometimes a surprise at how good they turn out to be at something new.
For a parent, the best part usually isn’t the finished craft at all.
It’s sitting at the table beside them while they make it.
That’s the real value behind dollar tree crafts for teens.
The projects are inexpensive, but what they create along the way is worth a lot more than a dollar.